Displaying the Markers and Zebra Patterns
57
Recording
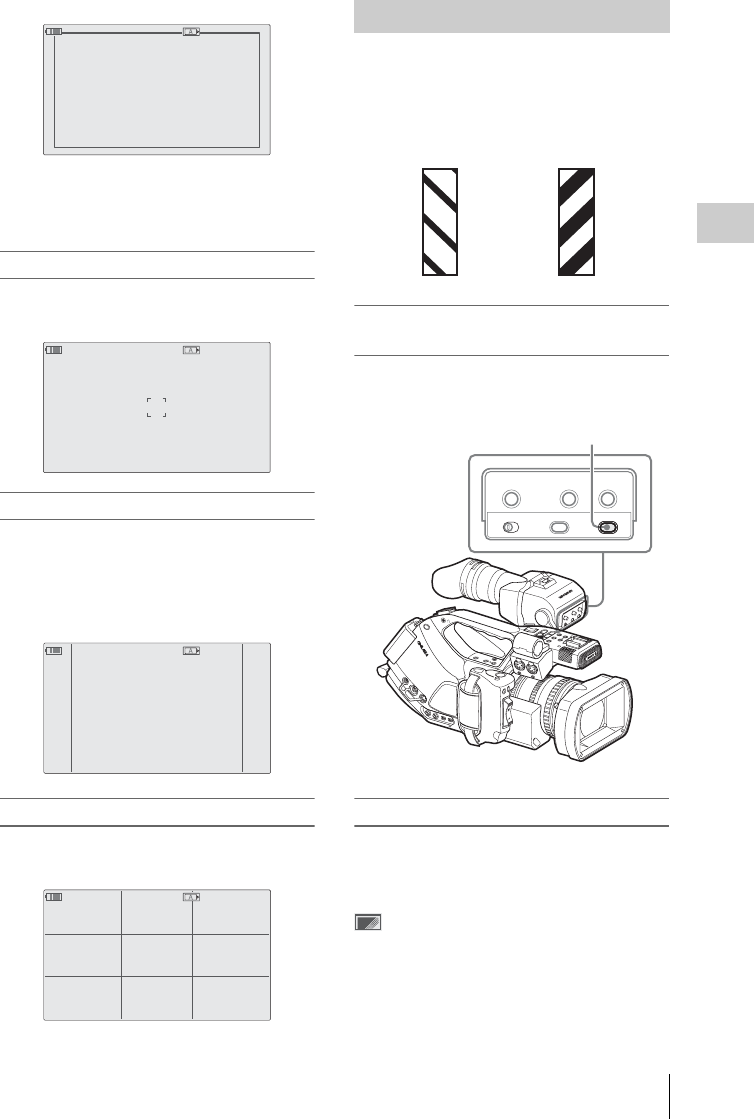
When the aspect marker is on, the safety zone
marker shows the effective area within the aspect
marker.
Displaying the center marker
Set “Center Marker” to “On” to insert the center
marker into the screen area.
Displaying the aspect marker
Set “Aspect Marker” to “On” to insert the aspect
marker into the screen area.
Select the width of the marker from among 4:3,
13:9, 14:9, and 15:9 with “Aspect Select.”
Displaying the guide frame lines
Set “Guide Frame” to “On” to insert the guide
frame lines into the screen area.
A zebra pattern(s) can be inserted to the picture in
the viewfinder to check the appropriate
luminance level.
Turning the zebra-pattern indication on/
off
Pressing the ZEBRA button turns the zebra
pattern-indication on/off.
Changing the zebra pattern
Using “Zebra” of the VF SET menu, you can
change the zebra pattern to be displayed.
Press the MENU button to set the camcorder to
Menu mode, display the VF SET menu with
, and select “Zebra” from the menu.
TCG 00:00:00:00 120min
STBY
Example: 95%
TCG 00:00:00:00 120min
STBY
TCG 00:00:00:00 120min
STBY
Example: 4:3
TCG 00:00:00:00 120min
STBY
Displaying the Zebra Patterns
Factory-set zebras
1 (70%) 2 (100%)
M
I
R
R
O
R
I
M
A
G
E
O
F
F
O
N
D
I
S
P
L
A
Y
/
B
A
T
T
I
N
F
O
Z
E
B
R
A
P
E
A
K
I
N
G
C
O
N
T
R
A
S
T
B
R
I
G
H
T
B
A
T
T
E
R
Y
R
E
L
E
A
S
E
C
O
M
P
O
N
E
N
T
O
U
T
D
C
I
N
M
O
N
I
T
O
R
O
U
T
S
V
I
D
E
O
A
U
DIO
O
U
T
C
H
-
1
C
H
-
2
A
S
H
O
T
T
R
A
N
S
I
T
I
O
N
B
T
C
/U
-B
IT
/D
U
R
ATIO
N
T
H
U
M
N
A
IL
F
R
E
V
P
R
E
V
S
E
L
/S
E
T
P
L
A
Y
/
P
A
U
S
E
C
A
N
C
E
L
R
L
F
F
W
D
l
s
j
G
/S
J
M
O
N
I
T
O
R
V
O
L
H
L
O
F
F
E
X
P
A
N
D
E
D
F
O
C
U
S
R
E
C
R
E
V
I
E
W
R
E
L
E
A
S
E
S
T
A
R
T
/
S
T
O
P
AUD
IO IN
C
H
-
1
M
I
C
L
I
N
E
M
I
C
+
4
8
V
M
I
C
L
I
N
E
M
I
C
+
4
8
V
C
H
-
2
MIRROR IMAGE
OFF ON
DISPLAY/BATT INFO
ZEBRA
PEAKING CONTRAST BRIGHT
ZEBRA
ZEBRA button
