


Administrating the Camera
Setting the Camera Image and Audio — Video / Audio Menu
26
Note
Permissible logo file specifications;
File format: PNG8 with alpha channel
Image size: 160 × 120 or smaller
Width (pixels): multiples of 16
When display position number 1, 2 or 3 is selected, the
following setting menus appear.
Type
Set the type of display information to codec, date &
time, event or text.
Custom string
Describes the superimposed content for each position.
For Type setting, codec is displayed as <codecinfo>,
date & time is displayed as <datetime>, event is
displayed as <event>, and you can add a custom string.
Codec: Displays the video codec information.
Date & time: Displays the date and time.
Event: Displays the event alarm information.
Text: Displays the custom string.
Text color
Select the font color of the superimposed text.
Background color
Select the background color of the superimposed text.
Alignment
Set the horizontal position of the superimposed text.
Transparent
Select the background color transparent of the
superimposed text. When you select Off, transparent is
not available.
Events displayed
Displays in the menu when the type is set to Event.
Select the type of superimpose to be displayed for the
event.
OK/Cancel
See “Buttons common to every menu” on page 19.
Day/Night Tab
Supported model: SNC- CX600
Use this tab to set the day/night function of the camera.
Day/Night
Mode
Select the day/night mode. This function has the
following modes.
Auto: Normally works in day mode; switches
automatically to night mode in a dark place.
Threshold
This mode is available when Auto is selected.
Set the brightness level when the night mode is set.
Hold time
This mode is available when Auto is selected.
Set the reaction time of changes in brightness.
Manual: Switch the day/night mode manually.
When you select Manual and the checkbox of the
night mode is selected, the camera works in night
mode. Otherwise, the camera works in day mode.
Timer: Normally the camera works in day mode. It
switches to night mode at the time you set in Timer
of Day/Night in the Schedule menu.
Status
Displays the day/night function status.
OK/Cancel
See “Buttons common to every menu” on page 19.
Privacy masking Tab
Using the privacy masking enables you to hide images
by masking specified parts of the images when
streaming.
Note
Perform the following before setting the privacy
masking.
•Set Image size1 in the Video codec tab of the Video /
Audio menu to the maximum rate.
• Deselect the checkbox of Image 1 in the PTZ control
tab of the PTZ control menu.
• Deselect the checkbox of Stabilizer in the Installation
tab of the System menu. After setting the privacy
masking, set the Stabilizer function again.
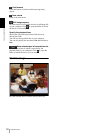
Preview screen
This screen is for monitoring images and configuring
privacy masking.
You can move the position of the privacy mask displayed
on the preview screen by drag and drop.
Effect
Set the effect of privacy masks.