


Administrating the Camera
Setting the Security — Security Menu
55
Note
To output audio using the SNC audio upload tool, set
Audio upload to Enable in the Common tab of the
Camera menu (page 36).
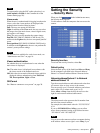
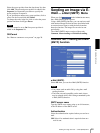
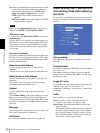
Viewer mode
When the user is authenticated for logging in to the main
viewer, select the viewer mode to be displayed after
authentication from the following items:
Full: The user can operate all functions.
Light: In addition to the View mode, the user can select
the image size of the main viewer, control digital zoom,
and capture a still image.
View: The user can only monitor the camera image.
Pan/Tilt (SNC-DM110 / DM160 / CM120 only): In
addition to the Light mode, the user can operate pan/tilt/
zoom.
Preset position (SNC-DM110 / DM160 / CM120 only):
In addition to the Light mode, the user can perform the
camera’s preset position settings.
Note
For the functions available for each viewer mode, see
“Administrator and User” on page 16.
Viewer authentication
Set whether the user is authenticated or not when the
main viewer is displayed.
On: The main viewer is displayed in accordance with
the viewer mode of the authenticated user.
Off: Select the viewer mode of the main viewer which is
displayed without authentication from Full, Pan/
Tilt, Preset position, Light or View.
OK/Cancel
See “Buttons common to every menu” on page 28.
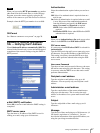
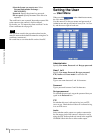
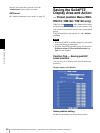
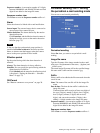
Setting the Security
— Security Menu
When you click in the Administrator menu,
the Security menu appears.
Use this menu to limit the computers that can access the
camera.
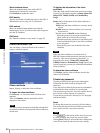
Security function
To activate the security function, select On.
Default policy
Select the basic policy of the limit from Allow and Deny
for the computers specified in the Network address/
Subnet 1 to Network address/Subnet 10 menus below.
Network address/Subnet 1 to Network
address/Subnet 10
Type the network addresses and subnet mask values that
you want to allow or deny access to the camera.
You can specify up to 10 network addresses and subnet
mask values. For a subnet mask, type 8 to 32.
Select Allow or Deny from the drop-down list on the
right for each network address/subnet mask .
Tip
The subnet mask value represents the bit number from
the left of the network address.
For example, the subnet mask value for “255.255.255.0”
is 24.
If you set 192.168.0.0/24 and Allow, you can allow
access from computers having an IP address between
“192.168.0.0” and “192.168.0.255”.
Note
You can access the camera even from a computer having
an IP address whose access right is set to Deny, if you