


Others
Using the SNC audio upload tool — Transmitting Audio to Camera
83
Notes
• Audio transmission stops if you switch the tab during
the transmission.
• Audio may be interrupted when the IP address is
changed if Obtain an IP address automatically
(DHCP) is set on IP address in the Network menu.
• Audio may be interrupted if you transmit it to many
cameras simultaneously.
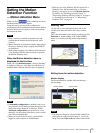
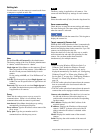
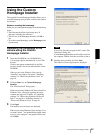
Sound adjustment and indicators
Adjust the microphone input volume by moving the
slider bar. You can adjust the volume even
during transmission.
Click to enable/disable sound muting. The
microphone input volume is displayed at the Level.
The transmission rate is displayed in the Bitrate box.
Click this button to hide the camera list. Click it again to
display the camera list.
Target camera(s) (Camera list)
Displays the cameras selected with the camera select
checkbox of the camera list in the Setting tab.
The list shows the information and status of the selected
cameras.
IP address: Displays the IP address of the network
camera. “DHCP” is shown at the end of the IP
address when the IP address is obtained with a
DHCP server.
Tip
During SSL communication, appears on the left
side of the IP address.
This camera does not support the SSL function.
Model: Displays the model name of the network
camera.
Serial: Displays the serial number of the network
camera.
Status: Displays the current status of the camera.
Ready: The camera is ready for connection.
Connected: The camera connection is successful.
Fault: The camera connection is unsuccessful.
Sending: Audio data being transmitted
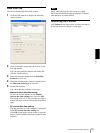
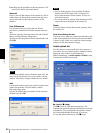
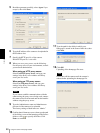
Voice alert tab
Use this menu to record the sound through the
microphone connected to the computer and upload the
recorded audio file to the camera. You can upload the
audio file to multiple cameras selected from the camera
list simultaneously.
(playback)
To start playback, open the recorded file or another
audio file and click this icon.
You can check the recorded sound or the contents of the
selected audio file. During playback, the progress bar
shows playback progress.
(stop)
Click to stop recording or playback.
When you click it during recording, recording stops, and
you can review the recorded sound or upload the
recording to the camera.
When you click it during playback, playback stops and
the progress bar display returns to the start position.
(recording)
Click to start recording of the sound input to the
computer microphone. The maximum recording time is
30 seconds.
The codec specified in the Setting tab is used for the
recording.
The recorded file is displayed as “RecordedFile.vof.”
Notes
• Recording or playback stops if you switch the tab
during recording or playback.
• The recorded file is not stored in the computer.