


6-4 Operator's Manual LDK 23HS mkII - HS Camera System Operating the Menu System
Making changes
To find out where you have to go to change a function,
consult the appendix to discover under which menu
group or subgroup the function you want to change is
located.
If the cursor points to an item (and there are no double
arrows to indicate a sub-menu) then the item pointed
to has a value. The value can be:
- a toggle value (only two values)
- a list value (more than two values)
- an analogue value (variable from 00 to 99)
or unavailable (---).
If the value is unavailable it cannot be changed. This
is indicated by three dashes (---). This can occur, for
example, when a function is switched off. The analogue
values associated with that function are then
unavailable.
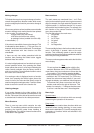
If there are only two values associated with the
function, then pressing the Select button toggles
between these two values.
If a value is displayed next to a function that is one of
several possible values, then pressing the Select
button places the cursor in a list menu indicating the
value currently selected. Use the Rotary control to
point to a new value. Press the Select button to return
the cursor to the function list.
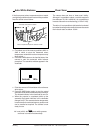
If an analogue value is displayed next to a function
name, then pressing the Select button places the
cursor in front of the value and the Rotary control is
used to change the analogue value. Press the Select
button to return the cursor to the function list.
Undoing changes
If you make changes to the video settings in the
Systems menu and you decide not to keep them, use
the Std. File button at the side of the camera to recall
a standard set of values for the video parameters.
Menu Structure
There is one top menu which contains six main
menus. The numbering scheme and the reasons for
grouping the functions under these heading is
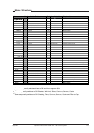
explained below. For a full list of menu functions refer
to the table in the appendix.
Menu numbers
The main menus are numbered from 1 to 6. Each
main function under the main menu is given a second
digit (for example, the Gain under the Operate menu
is given number 11, the Black function 12). In some
cases a third level number is given. For example, the
skin function of the contour function of the Setup
menu has number 256.
The first digit refers to the main menu
1 for Operate
2 for Setup
3 for VF/Lens
4 for Install
5 for Files
6 for Diagnostics
The second digit refers to the function under the main
menu. A third digit, if present, refers to the sub-
function. This numbering system is used to assign
particular functions to the programmable user switches
when they are being customized.
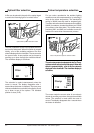
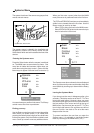
The menu number appears under and to the left of the
menu display.
Note
Do not confuse the menu number with the line
numbers. Because of the TOP and PREVIOUS
menu items, the menu numbers are 2 less than the
line numbers. This is not the case for the Main
menus as there are no TOP and PREVIOUS items
available in the TOP menu itself. The TOP menu
shows five main menu items initially. If you scroll
through the display, one additional menus appears.
To see how many lines a menu has, look at the
number under and to the right of the menu. This
number, for example, 1-7 indicates that the cursor
is at line 1 and that there are 7 lines altogether.
Menu logic
Operate menu
This menu contains the functions which are normally
used during the operation of the camera.
Setup menu
The setup menu contains those functions which are
initialized before starting shooting. In many cases
these are the individual (R, G and B) analogue setup
parameters of functions which are switched in the
operate menu.