


13
7.3.5. Termination Switch (DIP switch 2: No. 8)
Set the switch of the camera last connected to the RS-485 communications line to ON. (Factory setting: OFF)
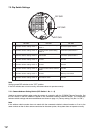
7.3.2. Communication Speed Setting Switch (DIP switch 2: No. 1 – 2)
Check to be sure that the communication speed set here is the same as that of the Remote Controller. When
changing the speed, change settings of all cameras and Remote Controller within the system. (Factory
setting: 38,400 bps.)
7.3.3. OSD Switch (DIP switch 2: No. 3)
When this switch is set to the OFF position, the initial screen does not disappear until communications with
other equipment are established following initial operation after the power has been switched ON. (Factory
setting: OFF)
7.3.4. Communication Method Selector Switch (DIP switch 2: No. 6)
Chooses the RS-485 communication method from Type A (used with the C-RM500 Remote Controller) and
Type B. Set the switch to the OFF position to choose Type A, and to the ON position to choose Type B.
(Factory setting: OFF)
No.1
No.2
bps
OFF OFF 38400
O N OFF 19200
OFF O N 9600
O N O N 4800
7.3.6. Firmware Update Switch (DIP switch 2: No. 1 – 3)
No.1: Used to update Master CPU firmware.
No.2: used to update Slave CPU firmware.
No.3: Temporarily pauses the initial operation.
More particularly, refer to the “Camera Controller Software Operation Manual” of the enclosed CD-R.
7.3.7. Memory Clear Switch (DIP switch 3: No. 7)
Switching on the power with this switch set to the ON position returns all camera settings to the initial setting.
The indication “Memory Clear” is displayed on the screen while clearing memory. After the indication has
disappeared, turn off the power and set the switch to the OFF position.
Note: Clock information and backup data are not erased.