


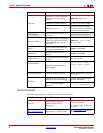


CAN Getting Started Guide www.xilinx.com 15
UG186 April 19, 2010
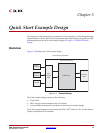
Implementing the Example Design
7. In the Component Name field, enter a name for the core instance.
This example uses the name quickstart.
8. After selecting the parameters from the GUI screens, click Finish.
The core and its supporting files, including the example design, are generated in the
project directory. For detailed information about the example design files and
directories see Chapter 4, “Detailed Example Design.”
Implementing the Example Design
After generating a core with either a Full-System Hardware Evaluation or Full license, the
netlists and example design can be processed by the Xilinx implementation tools. The
generated output files include scripts to assist you in running the Xilinx software.
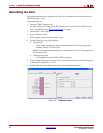
To implement the CAN example design, open a command prompt or terminal window
and type the following commands:
For Windows:
ms-dos> cd <proj_dir>\quickstart\implement
ms-dos> implement.bat
For Linux:
Linux-shell% cd <proj_dir>/quickstart/implement
Linux-shell% ./implement.sh
These commands execute a script that synthesizes, builds, maps, and places-and-routes the
example design. The script then generates a post-par simulation model for use in timing
simulation. The resulting files are placed in the results directory.
Simulating the Example Design
The CAN core provides a quick way to simulate and observe the behavior of the core by
using the provided example design. There are two different simulation types: functional
and timing. The simulation models provided will either be in VHDL or Verilog, depending
on the CORE Generator software Design Entry project option.
Setting up for Simulation
The Xilinx UniSim and SimPrim libraries must be mapped into the simulator. If the UniSim
or SimPrim libraries are not set for your environment, go to the Synthesis and Simulation
Guide in the Xilinx Software Manuals
for assistance compiling Xilinx simulation models.
Simulation scripts are provided for ModelSim.