


ENGLISH
23
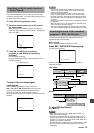
Press i or k to select CHANNEL, press j or
l to set the VCR channel number.
If you have connected the CATV using the CATV
converter, set the CHANNEL to match the cable box
output channel (usually CH3 or 4). Change the channel
on the CATV converter instead of the VCR.
Set SPEED and REPEAT as in step 3.
For details of SPEED and REPEAT, see “Setting the
timer with VCR Plus+ system” on page 21.
If you want to set another program, press k to
select PROGRAM, then press j or l to
display another program number. And repeat
steps 3 through 7.
Press MENU to return to the normal screen.
Press POWER to turn off the VCR.
• “TIMER” appears in the display window, and the VCR
stands by for timer recording.
• If the cassette-in indicator flashes, a cassette is not
inserted. If the cassette-in indicator flashes and the
cassette is ejected, the cassette’s erasure prevention
tab is removed.
To correct the data while setting
Press i or k until the item you want to correct highlights,
then press j or l to set the correct data.
To cancel the program
Select PROGRAM in the menu. And press j or l to
display the program you want to cancel, then press CLEAR
to cancel.
Tips
• If “FULLY PROGRAMMED” flashes and the setting of
PROGRAM 1 appears. 8 programs are already set. Cancel
an unnecessary program.
• To confirm the settings, select PROGRAM in the menu.
Then press j or l to display the settings of each program.
Press MENU to return to the normal screen.
• If you want to record the program through the line input, press
j or l to display “LINE1” (from the AUDIO/VIDEO IN jacks
at the rear) or “LINE2” (from the AUDIO/VIDEO IN jacks in the
front) in step 5 instead of the VCR channel number.
Notes
• When the power supply is interrupted for more than 60
minutes, the preset program is cleared. In this case, you
have to set the timer again.
• When the tape reaches the end during timer recording,
“TIMER” flashes in the display window.
• The VCR may not work correctly when you use a T-210
tape, even if you select AUTO in step 6.
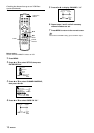
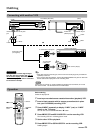
1
2
Setting the timer manually
If you cannot use VCR Plus+ system, you can set the timer
manually.
You can set up to 8 programs within one year of the current
date.
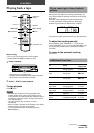
Before starting
• Check that the VCR clock is set correctly.
• Insert a cassette with its erasure prevention tab in place.
• Set the VCR/CATV/DBS/TV selector to VCR.
• If the CATV converter is used for the timer recording,
check that the CATV (or satellite) converter is turned on
and the channel you want to record is selected.
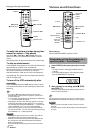
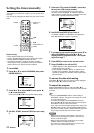
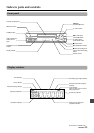
Press MENU.
Press i or k to select PROGRAM, then press
ENTER/DISPLAY.
Press i or k to select MONTH, then press j
or l to set the month.
Press and hold j or l to change the setting rapidly.
Set DAY, START time and STOP time as in step
3.
3
4
5
6
7
8
9
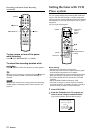
CLOCK
PROGRAM
TUNING
SETUP
SELECT ENTER
TO EXIT PRESS
ENTER
MENU
j/l
ENTER/DISPLAY
i/k
CLEAR
MENU
POWER
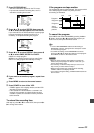
MONTH : JULY
MONTH : JULY
PROGRAM 1
DAY :
START :
STOP
:
CHANNEL
:
SPEED
:
REPEAT
:
TO EXIT PRESS
MENU
SELECT ADJUST
MONTH :
JULY
PROGRAM 1
DAY : 3 MON
START : 6 : 00 PM
STOP
: 7 : 30 PM
: 7 : 30 PM
CHANNEL
:
SPEED
:
REPEAT
:
TO EXIT PRESS
MENU
SELECT ADJUST
MONTH : JULY
PROGRAM 1
DAY : 3 MON
START : 6 : 00 PM
STOP
: 7 : 30 PM
CHANNEL
: 4 CATV : 4 CATV
SPEED
: AUTO
REPEAT
: ONCE
TO EXIT PRESS
MENU
SELECT ADJUST
MONTH : JULY
PROGRAM 1
DAY : 3 MON
START : 6 : 00 PM
STOP
: 7 : 30 PM
CHANNEL
: 4 CATV
SPEED
: SP
REPEAT
: ONCE : ONCE
TO EXIT PRESS
MENU
SELECT ADJUST
VCR /CATV/
DBS/ TV