


20 Installation and Operation Guide
4. Network Configuration
4.1 Cable Connections
Please follow the instructions below to connect your IP camera to a computer or a network and to
choose a proper RJ-45 cable configuration for connections.
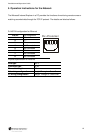
Physical specifications of the RJ-45 cable for Ethernet
Wire Type Cat. 5
Connector Type RJ-45
Max. Cable Length 100 m
Hub Wiring Configuration Straight Through
PC Wiring Configuration Straight
4.2 Configure Your IP Camera Network Settings
Upon connecting with the network hardware, you need to activate the network function and
configure the proper network settings of the IP camera.
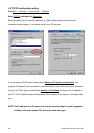
4.2.1 Enable DHCP Function
This function can onl
y work if the LAN, which the unit is connected to, has a DHCP server. If the
DHCP server is working, please turn on to use the DHCP protocol; now the IP CAMERA will
obtain an IP address automatically from the DHCP server. In this instance, please skip section
4.2.2 (Set IP address) and follow section 4.3 (TCP/IP Communication Software).
NOTE: The IP Dome camera software default setting is DHCP OFF. Users can build the
camera working environment with a static IP address. The default static IP is
192.168.1.168. You can set an IP address for the camera if the LAN unit isn’t
connected to a DHCP server. Or turn on to use the DHCP protocol if the DHCP
server is working in the LAN, The camera will obtain an IP address automatically
from the DHCP server. The camera is linked by its Video Out connection via a
BNC connector to a monitor's Video In connection. If this connection is there, you
can see some information on the monitor screen, such as the camera factory
default Static IP address.