


AXIS 2130/2130R User’s Manual Installation
9
Installation
• Quick installation - Follow the instructions below to quickly install on an Ethernet network.
• Easy installation - See The AXIS IP Installer, on page 24.
Before connecting the hardware
1. Note the serial number on the underside of the unit. You need to know this
to set the IP address
. The 12-digit serial number is the same as the Ethernet
address, e.g. Ser.No: 00408C1A2B3C = Ethernet Address:
00-40-8c-1A-2B-3C
2. From a computer on your network, assign your AXIS 2130 with a unique IP address using the
appropriate method for your operating system.
Note: In some Unix systems, the ARP command can be located in a directory that is not on the
command path. Administrator rights may be required.
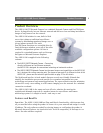
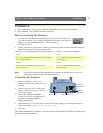
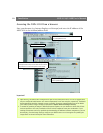
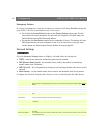
Connecting the hardware
1. Connect an Ethernet cable to the
Ethernet connector and attach it to the
network.
2. Connect the power cable to the power
supply connector and connect it to the
main power supply.
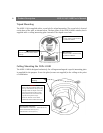
3. Ensure that the Power Indicator
(on the front panel) is permanently lit
and that the Network Indicator
flashes intermittently.
4. Approximately 10-15 seconds after connecting the power supply, the following message (or
similar) is returned:‘Reply from 172.21.1.200’
5. Exit Ping.
The initial installation is complete. You can now access the AXIS 2130 directly from your
browser, as described below.
Windows only - Start a Command Prompt and type these commands:
Syntax:
arp -s <Server IP address> <Ethernet address> <my PC IP address>
ping -t <Server IP address>
Example:
arp -s 172.21.1.200 00-40-8c-10-00-86 172.21.1.193
ping -t 172.21.1.200
UNIX only - Type this in your command line:
Syntax:
arp -s <IP address> <Ethernet address> temp
ping <IP address>
Example:
arp -s 172.21.1.200 00:40:8c:10:00:86 temp
ping 172.21.1.200
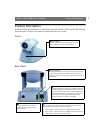
Ethernet
Connector
Network
Indicator
Power supply
Terminal connector