


20
21
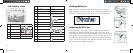
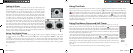
Using the Direct Printing (Pictbridge) Feature
The Outdoor Camera also supports direct printing from the camera to PictBridge com-
patible printers, without using a PC. It is recommended that you first read the direct
printing/PictBridge section of your printer’s manual. With the printer power on, con
-
nect the supplied USB cable to the camera, then to the direct print USB port on the
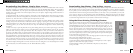
front or side of the printer. The camera’s display should come on (if not, turn on the
camera). Select the printer icon (1), and press “OK”. After a brief delay while the camera
to printer communication is established, you should see the camera’s Print options menu
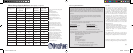
(2). Use the up/down keys as usual to select a print option, then press OK. The options
are (in order from top to bottom icon):
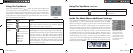
1
2
1. Print One (Use left/right keys to select the image, up/down to select # of copies you
wish to print. Press OK when ready to print.)
2. Print All Images (No/Yes). Prints all photos stored in camera.
3. Print Selected Photo from Thumbnail Review (use left/right keys to select a photo,
up/down to choose how many copies you want)
4. Print All Images as Index: prints thumbnails of all photos (“contact sheet”)
5. Exit print menu
4. Open My Computer or Windows Explorer. The camera will be seen as a new “Removable Disk” with an unused
drive letter assigned to it. Double click this new “Disk” icon, open the “DCIM” folder inside, then any folder(s)
inside that (“100BUSHN” ,etc). Your photos are the JPEG files inside-they have the prefix “BUSH__” followed by a
number, same as seen earlier on the camera’s display when you review photos. Single clicking any file should show a
small preview image.
5. Click “Edit>Select All” (or click on one photo, contol+click to select multiple photos), then “Edit>Copy to Folder”
(in Windows menus). Select an existing folder on your hard drive, such as “My Pictures”, or create a new folder (“2004
Vacation”, etc), then click “OK” to transfer copies of the photo files you want.
6. After the photos are transferred to your hard drive, you can disconnect the camera. Windows may produce a screen
warning that you have disconnected a USB device without stopping or ejecting the “disk” first (your photo files
will not be harmed). If so, check the box that adds an icon to your system tray or taskbar. Then next time you finish
transferring photos, you can click that icon first, and “Stop the USB Mass Storage Device” before disconnecting
the camera.
7. You’re now ready to open the photo files in any photo editing software. Just use File>Open and go to the folder
where you stored the photos earlier. If you are using PhotoSuite, select File>Open Photo, then use the “Look in”
pull down menu at the top of the Open window, select “My Computer”, select your hard drive, and double click
any photo in the folder where you copied the files from the camera. It is also possible to open and work with your
photos directly from the Outdoor camera while it is still connected.To do this with PhotoSuite, first follow steps 1-3,
then open PhotoSuite, select File>Open Photo and use the “Look in” menu to select My Computer, then select the
“Removable Disk”, and open the folders inside until you get to the JPEG photo files. If you choose to work this way,
from a connected camera, be sure that you save the photo (when you are done editing) to your hard drive, and not
the camera’s memory or card. To do this in PhotoSuite, after clicking “Done”, answer “Save Changes?” with “Yes”, but
then answer “Replace Existing File”? with “No” and use the “Save As” dialog box to save the edited photo in a folder
on your hard drive (“Save In>Local Disk”), not the “Removable Disk” (camera).
Downloading Your Photos - Step by Step continued
Downloading Your Photos - Step by Step continued
8. If you are new to photo editing on a computer, consult your software’s Help menu (PhotoSuite has extensive
built-in Help) for tips on using its features. Along with adjusting the brightness, contrast, sharpness and color
of your photos, you can resize the photo to fit the paper if you are printing, or save a smaller, low or medium
resolution file for email or inserting into documents. When you are ready to save your edited file, you may want
to use “Save As” and give it a more descriptive name than “BUSH0001”. Doing this also preserves the original
file as a backup to reopen and re-edit later. Make sure you have successfully transferred all the photos you wanted
to save before using “Delete All” on your camera to make room for new images.
11-0013 1LIM.indd 20-21 9/22/04 4:33:42 PM