


4
5
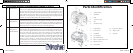
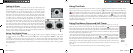
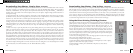
1. Shutter Release
2. Viewfinder
3. Flash
4. Connector Cover
5. Lens
6. Self-Timer Lamp
7. LCD Monitor 15. Quick View Button
8. Power Button 16. Tripod Socket
9. Viewfinder 17. Strap Bar
10. 4-way Keypad
11. OK / Menu Button
12. Battery Compartment Cover
13. Batteries (AA x 2)
14. SD Card Slot
QUICK GUIDE: BUSHNELL OUTDOOR DIGITAL CAMERA 11-0013G/Y
5
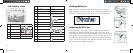
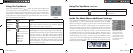
Take A Photo
Press the shutter release button halfway down to set the autofocus (green AF light
comes on), then fully down when you are ready to take the photo. The frame marks in
the center of the LCD show the area used to set focus. For off-centered subjects, place
this frame over the main subject, press the shutter button until the AF light is on, con
-
tinue to hold it, then move the camera to recompose your image before depressing the
shutter fully to snap the picture. Scene presets for landscapes, action, and portraits are
available, see “Inside the Mode Menu” for detailed instructions.
6
Review and
Delete Photos
Press (hold) “Quick View” to review stored photos. The left/right arrow keys step back-
wards/forwards through the photos. The up/down arrow keys zoom in/out for close
inspection of photo details. To delete a photo during review, briefly press Quick View
(trashcan icon appears). Press the down key to choose Yes, then press the OK button to
delete the photo. To exit the photo review, press and hold Quick View.
7
Connect To A
Computer &
Transfer Photos
Before connecting the camera, install the drivers from the CD-ROM if you use Win-
dows 98/98SE, and install PhotoSuite if you do not already have photo editing soft
-
ware. Connect the supplied USB cable from your PC to the USB port under the con-
nector cover (above the strap). Press “OK” on the camera. If you have Windows XP,
just follow the onscreen directions/options. If you have Win 98 or 2000, open “My
Computer” on your PC. The camera is identified as a “Removable Disk”. Double click
this “disk” and open the folders inside. Select any or all of the “.jpg” files, and use “Edit
>Move (or Copy) to Folder” to save the photos to “My Pictures” or another folder on
your hard drive. Once transferred, you may disconnect the camera, and the files can be
opened, edited and resaved using the supplied PhotoSuite or any imaging software . See
“Downloading Your Photos Step by Step” for more details.
Parts Identification
11-0013 1LIM.indd 4-5 9/22/04 4:33:32 PM