


1-3
Cisco Video Surveillance System IP Camera User Guide
OL-14220-01
Chapter 1 Overview
IP Camera Physical Details
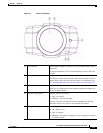
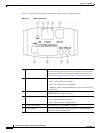
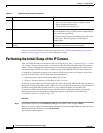
Figure 1-1 Front of IP Camera
1 Lens opening The IP camera supports a variety of C and CS mount lenses, which
attach here.
For best performance, Cisco recommends that you use a DC auto
iris lens.
2 Focus ring Allows you to adjust the back focus of the IP camera.
You must loosen the focus ring hex screw on the bottom of the IP
camera before you can rotate the focus ring. For instructions, see
the “Adjusting Back Focus on the IP Camera” section on page 2-7.
3 Microphone Captures audio.
There also is a connection for an optional external microphone on
the rear of the IP camera.
4 Activity LED (green) Indicates activity as follows:
• Off—No activity.
• Blinking—Activity detected.
Activity can occur when the IP camera communicates with the
network or when a user views video from the IP camera.
5 Ready LED (amber) Indicates power state as follows:
• On—Power is on.
• Off—No power.
• Blinking—IP camera is starting up. The start up process takes
15 to 20 seconds.