


26 Using Your Printer
www.dell.com | support.dell.com
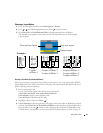
Installing Printer Drivers and Software
1
Make sure the power cable is connected to the printer and the printer is on.
2
Insert the
Drivers and Utilities
CD into your computer.
3
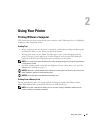
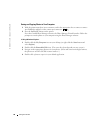
Plug the USB cable (sold separately) into the USB connector on your computer.
4
Plug the other end of the USB cable into the square USB connector on the printer.
5
Follow the on-screen instructions to install the printer drivers and printer documentation.
Select
Ty p i c a l
to install all components. Select
Custom
to install specific components.
6
Insert the remaining two CDs, one at a time, to install your photo editing software programs.
Follow the on-screen instructions on the printer.
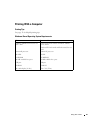
Printing From a Computer
To Print
1
Turn on your computer and printer, and make sure they are connected with a USB cable.
2
Using your preferred application, open the photos you want to print.
3
Access printer settings by selecting
Print
or
Page Setup
from the
File
menu (depending on
your application and operating system).
4
Make sure the printer is selected as the current printer and that the paper size is set to
4 x 6 in. (102 x 152 mm).
5
Change any other settings as needed, then click
OK
or
Print
. (Depending on your application
and operating system, you may first need to return to the main menu and select
Print
from
the
File
menu.)
NOTE: Print selections made from the printer in standalone mode (use of printer without a computer) are
not used when you send a print job from the computer.
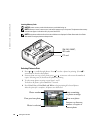
USB connector
to PC