


43
English
TROUBLE
SHOOTING
Symptoms and Confirmation
Check the following items. If any abnormality is found, consult the seller from whom you have
purchased this product or our branch/office near your location
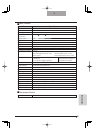
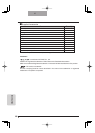
Symptom Possible cause/counter measure
No image is
displayed.
• The cable is not correctly connected.
• The AC adapter is disconnected from the wall outlet.
• The AC adapter is disconnected from the power supply socket of
the presenter.
• The power supply is not ON. (Green light does not turn on)
• Zoom is set at the TELE side, displaying only the white/black part of
the document.
• Turning ON the power supply immediately after turning OFF may
not start the unit. Wait for several seconds after turning OFF the
power supply, and then turn it ON.
• The dip switch is not set to proper image output (RGB/VIDEO).
In such case, set the dip switch properly by referring to p.12
[OUTPUT].
No image is
displayed from the
USB.
• The DIP switch is not set to [RGB]. When the DIP switch is set
to [VIDEO], the image cannot be output from the USB. Refer to
“OUTPUT (DIP switch)” on p.12 to switch the output to [RGB].
The image is out of
focus.
• The document (object) is too close to the lens.
• Zoom is set at the TELE side after focusing at a wide angle (WIDE
side). Focus to its maximum limit at the TELE side.
• Some auto focus may be diffi cult to adjust. Focus on an image
manually referring to “Manual focus” on p.37.
The video output
image is disarrayed.
• Video output is set to [NTSC]. If this product with the NTSC
system set is connected to the monitor specially designed for the
PAL system, the video image may not be normally output but be
disarrayed or in black and white. Refer to “OUTPUT” (p.12) to
switch the video output system.
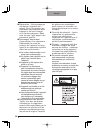
The image is too
dark.
• The intensity of the lighting is insuffi cient. Press the
[BRIGHTNESS •
] button on the main unit adjust brightness.
The image is striped. • This may be interference fringes between dots of printed matter
and TV scanning lines or CCD pixels. Changing the projection
range may mitigate the trouble.
• Vertical stripes may appear on an LCD projector image. Manually
adjusting dot clock at projector side may mitigate the trouble.
The image does not
move.
• Camera image is set to [Pause]. Set [Pause]
→
[Off] in the OSD.
About the lamp (LED lighting)
The brightness of the lamp with which this product is equipped will degrade with long-term usage. If
its brightness has been degraded greatly, we will replace the part for a charge. Consult the seller from
whom you have purchased this product or our branch/offi ce near your location.
About the long-term usage of this product
If this product is used for longer than the warranty period, its performance and quality may deteriorate
due to the lifetime of its parts. In this case, we will replace the parts for a charge. Consult the seller
from whom you have purchased this product or our branch/offi ce near your location.
TROUBLE SHOOTING
6