76 EN
CONTROLS, INDICATIONS AND CONNECTORS
(Cont.)
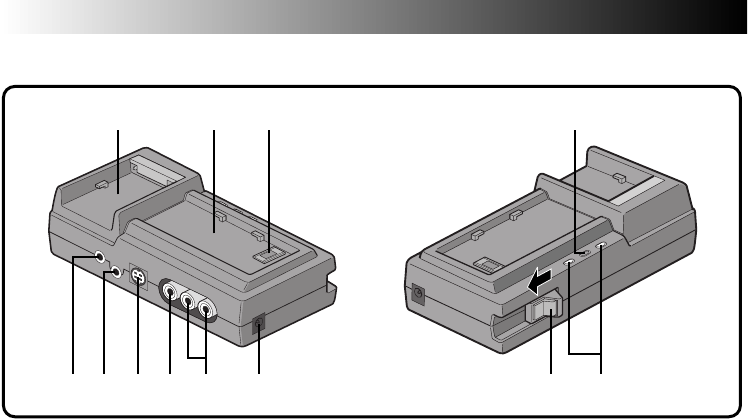
1 DC charger (੬ pg. 8)
Attach the battery pack to charge.
2 Camcorder attachment part (੬ pg. 53)
Attach the camcorder to this part when charging
the battery installed in the camcorder or when
editing.
3 Multi connector (੬ pg. 53)
The AC Charger Station can be connected with
this camcorder through this connector. Never
touch it with your hand or hit it with a hard
object; if the pins are damaged, the connectors
will become unusable due to contact failure.
4 EDIT connector (੬ pg. 61)
Using an editing cable, connect to the remote
control or VCR.
5 JLIP (Joint Level Interface Protocol)
connector
Connect to a JLIP-compatible camcorder or VCR
to control it from the computer using JLIP Player
Pack (optional) etc.
NOTE:
Make sure that the camcorder is turned on while
connecting the camcorder to a PC using the AC
Charger Station’s JLIP connector. If the camcorder is
turned off (because the Power Dial is set to “OFF”
or due to Auto Shut Off* etc.) while the JLIP
program software is used, it will be impossible to
control the connected devices from the computer.
In such a case, first try turning the camcorder on
again, or unplug the JLIP connection cable from the
AC Charger Station’s JLIP connector. Then, initialize
or run the software again.
* Auto Shut Off:
If 5 minutes elapse in the Record-Standby mode
or in the Pause mode, the camcorder’s power
shuts off automatically to conserve energy.
6 S-VIDEO OUT connector
(
੬ pg. 54, 55, 61)
•Outputs S-Video signal.
•Connect to a video unit equipped with an
S-Video connector.
7 VIDEO OUT connector
(
੬ pg. 54, 55, 61)
Connect to a TV or VCR using the VIDEO cable
(provided).
8 AUDIO OUT connector [L/R]
(
੬ pg. 54, 55, 61)
Connect to a TV or VCR using the Audio cable(s)
(provided).
9 DC OUT jack (੬ pg. 10)
Connect the DC cord (provided) and plug it into
the camcorder.
0 Lock lever (with release button)
(
੬ pg. 53)
Slide the lock lever in the direction of the arrow
to connect to the camcorder. To detach the
camcorder, press the release button and slide the
lock lever in the opposite direction of the arrow.
! Charger Indicator (for camcorder or
battery) (
੬ pg. 8, 53)
Blinks during charging. When charging is
finished, this indicator stops blinking and stays
lit. When the camcorder is turned on, charging
is interrupted.
@ Power lamp
321
9875 64
!0
@
AC Charger Station


