


44 EN
MDOESOUND
MDOE
12
BIT
ROSYNCH
ODEREC M
COPY
STEREO–
SOUND
1
SP
OFF
–
–
–
–
NRETUR
O.O
RE NEON SC LCD/TV
UAOTIMETDATE/
T I ME CODE
–
–
–FFO
NRETUR
BEEP
MELODY
NO
TALLY
–
–
–
DEMO M ODE NO
S
O
U
ND IN
–CIM
CAM ERSET
NRETUR
MSYSTE
AYDISPL
YMEMOR
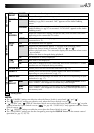
VIDEO SOUND MODE
MODE
MODE
12
BIT
SYNC ROH
REC
END
COPY
MSYSTE
AYDISPL
YMEMOR
VIDEO
TCPROTE
DELE ET
DPOF
ATFORM
END
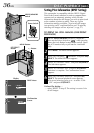
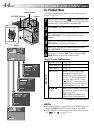
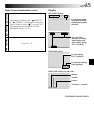
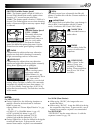
For Playback Menu
The following procedure applies to all except Synchro
Comp (੬ pg. 73).
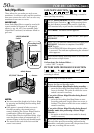
1
Set the Power Switch to “ ” while pressing down
the Lock Button located on the switch. Open the LCD
monitor fully or pull out the viewfinder fully.
2
Press MENU. The Menu Screen appears.
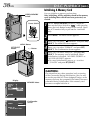
3
Press + or – to select the desired function icon, and
press SET/SELECT. The selected function menu
appears.
4
Press + or – to select the desired function, and press
SET/SELECT to display the Sub Menu.
5
Press + or – to select the desired parameter and
press SET/SELECT. Selection is complete.
6
Press + or – to select “ RETURN” and press SET/
SELECT twice to close the Menu Screen.
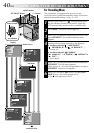
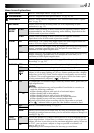
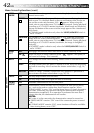
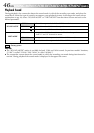
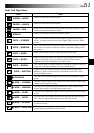
Menu Screen Explanations
Display
੬ pg. 46.
੬ pg. 46.
੬ pg. 73.
Allows you to set the video
recording mode (SP or LP)
depending on your preference
(੬ pg. 15). It is recommended
you use “REC MODE” in the
“ VIDEO” when using this
camcorder as a recorder during
digital dubbing (੬ pg. 59).
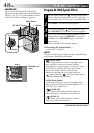
ON: Enables dubbing of images
recorded on a tape to a memory
card (੬ pg. 60).
OFF: Enables snapshots to be
taken during video playback.
NOTES:
●
It is also possible to change the ON SCREEN settings by
pressing DISPLAY on the remote control (provided).
●
“REC MODE” can be set when the Power Switch is set
to “ ” or “ ” (
੬
pg. 15, 41).
VIDEO
USING MENUS FOR DETAILED ADJUSTMENT
(cont.)
SOUND MODE
12BIT MODE
SYNCHRO
REC MODE
COPY
CONTINUED ON NEXT PAGE
Power Switch
MENU Button
Lock Button
SET/SELECT Button
+, – Button