


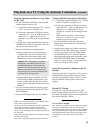
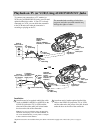

Playback on a TV Using the Antenna Connection (continued)
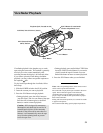
Playback Operation and How to Copy Tapes
on the VCR
1. Set the CHANNEL 4CH/3CH switch on the RF
output adapter to 4CH or 3CH.
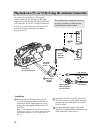
2. A. Camcorder connected directly to TV: Turn on
the TV and tune it to channel 3 or 4.
B. Camcorder connected to VCR that is already
connected to TV: Turn on VCR and tune it to
channel 3 or 4”. Operate the TV as you
normally do to see the signal coming from the
VCR.
3. Attach a power supply, and slide the camcorder’s
POWER switch to the PLAY position. Insert the
cassette you want to play back.
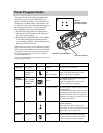
4. Press the PLAY button to begin playback.
• During playback, press the still (ll) button to
“stop the action” and view one frame of the
tape. Press the still (ll) button again (or the
PLAY button) to return to normal playback.
• During playback, press and hold the F.FWD
(fast forward) or REW (rewind) button if you
want to visually search the tape in forward or
reverse. Release the button to return to normal
playback.
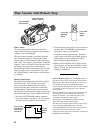
5. To copy what the camcorder is playing, place a
blank cassette in the VCR, and press the VCR’s
RECORD button.
6. Press the STOP button when you are finished.
Notes: The corresponding buttons on the remote control
can be used to operate the camcorder.
The camcorder can play back tapes recorded in SP or LP
speed. The LP indicator appears in the electronic
viewfinder when a tape recorded at LP speed is being
played. Tapes recorded at SLP cannot be played back on
this camcorder.
During still and search operations, it is normal for streaks
to appear in the picture.
The sound is muted during special playback operations.
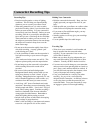
Viewing What the Camcorder Is Recording
1. A. Camcorder connected directly to TV: Turn on
the TV and tune it to channel 3 or 4.
B. Camcorder connected to VCR that is already
connected to TV: Turn on VCR and tune it to
channel 3 or 4”. Operate the TV as you
normally do to see the signal coming from the
VCR.
Note: When the camcorder is used as a camera,
turn the TV’s volume down to prevent a high-
pitched squeal caused by feedback.
2. Set the CHANNEL switch on the RF output
adapter to the same channel you selected on the
TV (or VCR).
3. Attach a power supply and slide the camcorder’s
POWER switch to the CAM position. Insert the
cassette you want to record on. Make sure the
ON/POWER SAVE lever is in the ON position.
Press the thumb trigger on the camcorder (or the
RECORD START/STOP button on the remote
control) to start recording. You can watch what
you are recording on the TV screen.
Seeing the Camcorder’s displays on the TV
Screen.
When the camcorder is connected to a TV, press the
DISPLAY button on the remote control to see the
camcorder’s viewfinder displays on the TV screen.
Press the DISPLAY button again to remove the
displays.
Normal TV Viewing
For normal TV viewing, you may leave the RF
output adapter hooked up to the TV (or VCR). Just
disconnect the adapter’s plug from the camcorder or
turn off the camcorder’s power.
Note to Cable TV Installer
This reminder is provided to call your attention to Article
820-40 of the National Electrical Code (Section 54 of
Canadian Electrical Code, Part I), that provides guidelines
for proper grounding and, in particular, specifies that the
cable ground shall be connected to the grounding system
of the building as close to the point of cable entry as
practical.
33
Caution: Still is designed for momentary
interruptions, and should not be used for
extended time periods. If the camcorder
remains in the still mode for more than five
minutes, the camcorder will automatically
move the tape away from the spinning heads
to prevent excessive tape wear.