


8
ENFORCER Mini PTZ Camera
SECO-LARM, U.S.A., INC.
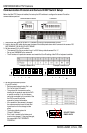
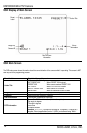
Communication Protocol and Camera ID DIP Switch Setup:
Before the Mini PTZ Camera is installed, first set up the DIP switches to configure the camera ID and the
communications protocol.
a
Communication Protocol
Camera ID
On
Value
On
Value
1
2
3
4
5
6
7
8
1
2
4
8
16
32
64
128
1
2
3
4
5
6
7
8
1
2
4
8
16
32
64
128
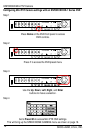
2
+
8
=
10
Example: Camera ID=5
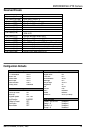
Example: Camera ID=10
4. Set the communication protocol
(4- pin DIP switch):
– Set the proper protocol using Pin 1 and
Pin 2 of the 4-pin DIP switch.
– The protocol for the camera must be
identical to the protocol used by the DVR
or pan/tilt controller. If not, the camera
cannot be controlled by the controller. See
the DVR or pan/tilt controller
manual for protocol information.
– If the protocol of the camera is changed,
the camera must be turned off and then
turned back on for the change to take
effect.
– The factory default protocol is
"Pelco-D, 2400 bps."
– Pins 3 and 4 are set by the factory and
must not be changed. If they
are changed,
the camera WILL NOT OPERATE
PROPERLY.
1
+
4
=
5
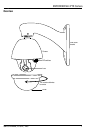
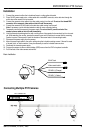
1. Remove the clear dome of the Mini PTZ Camera by turning it counterclockwise by hand.
2. Look for the two DIP switch blocks
near the base of the black plastic dome which surrounds the camera. DO
NOT REMOVE THE BLACK PLASTIC DOME.
3. Set the camera ID (8- pin DIP switch):
– The camera ID is a binary number from 1 to 255. Factory default camera ID is "1."
– Do not use "00000000" as a camera ID.
– The ID number of a particular camera must match the Cam ID setting of the DVR or keyboard controller.
DO NOT TOUCH
PINS 3 AND 4