


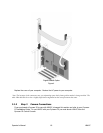


2.1.5 Step 5 Configure Camera Type
You should now have the LBA-PC application window on your monitor. The default configuration is
for a basic CW laser setup. This will allow you to verify that your camera and hardware are operating
correctly. If you received any error or warning messages while starting the LBA-PC application, refer
to the Error Messages section in this chapter before proceeding.
Before you can begin to collect data from your camera you must select the correct camera type. To
do this click Options, Camera..., and then click on the Camera drop down arrow. Select the
camera type that matches (or most closely matches) your specific camera, then click on OK.
To save this setup configuration... Click File, then Save Config...; enter a file name for this
configuration, then click OK. This file name has now become your new default configuration file.
This default will remain, from one program startup to the next, until you save or restore a new
configuration file; at which time, the last loaded or saved configuration becomes the default.
2.1.6 Step 6 Collect Data
Click the Start! menu item to begin collecting data from the camera. The frame display window
should immediately start changing colors corresponding to the intensity of the light reaching the
camera sensor, and the beam profile displays should change from a flat line in proportion to the light
intensity at the cursors.
If the room light is bright enough and/or the camera is sensitive enough, the frame display window
may be entirely white as the horizontal and vertical profile displays move upward and to the right,
respectively. If this is the case, reduce the amount of light reaching the camera sensor by shading it
with your hand. You should be able to obtain the entire range of colors shown on the color bar along
the right side of the display window. If you are using a camera with a lens, you should be able to
obtain a recognizable image by adjusting the lens f-stop and focus.
2.1.7 Step 7 Sample Configurations
You are probably now ready to try looking at a laser, and to go exploring the many operating options
of the LBA-PC.
CAUTION
Before you expose your camera to your laser beam, make sure that
the power/energy of your laser is well below the damage threshold
of your camera’s photo imager. You may also need to attenuate
your beam to bring it into a range that will prevent your camera’s
imager from saturating.
To help you get started, we have created a set of configuration files that you can restore. These
configuration files will adapt the LBA for a variety of basic operating modes.
However, these configuration files do not know which particular camera you are using. Therefore you
must select the appropriate camera to complete your setup. To select a camera, you will have to
repeat the procedure in Step 5.
Operator’s Manual LBA-PC
Doc. No. 10654-001, Rev 4.10
21