30
Step 6: Inserting a disc or a “Memory Stick PRO
Duo”
When you select [INT. MEMORY] in
“Step 5,” this “Step 6” operation is
unnecessary (DCR-DVD410E/DVD810E).
When you select [DISC] in “Step 5,” a new
8 cm DVD-RW, DVD+RW, DVD-R, or
DVD+R DL is required (p. 12).
b Notes
• Remove dust or fingerprints from the disc
beforehand, using a soft cloth (p. 118).
1 Check that the power of your
camcorder is on.
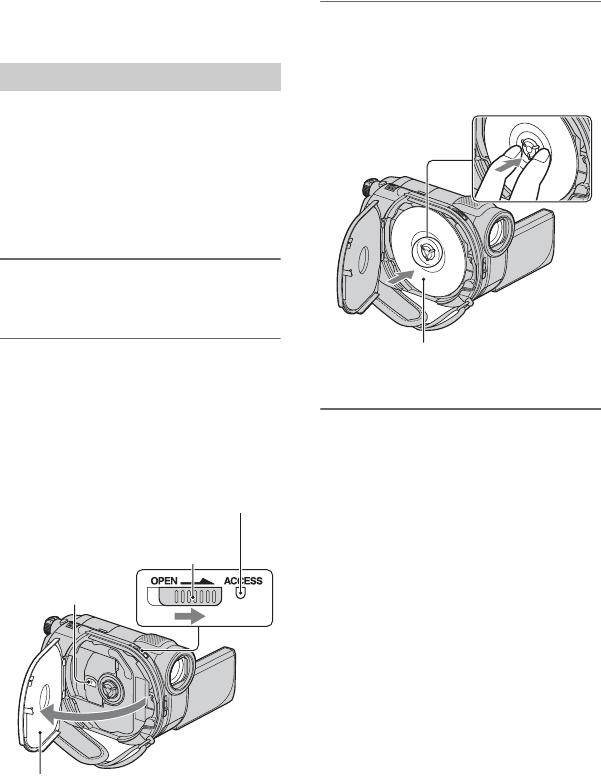
2 Slide the disc cover OPEN switch
in the direction of the arrow
(OPEN l).
[PREPARING TO OPEN] appears on
the screen. The disc cover slightly opens
automatically.
3 Set the disc with the recording
side facing your camcorder, then
press the center of the disc until it
clicks.
4 Close the disc cover.
[DISC ACCESS] appears on the screen.
It may take some time for the camcorder
to recognize the disc.
x DVD-RW/DVD+RW
A screen appears to ask whether you
will use [DISC SELECT GUIDE].
Using [DISC SELECT GUIDE] lets you
format the disc by following the
guidance on the screen. If you do not
want to use it, proceed to step 5.
x DVD-R/DVD+R DL
You can start recording immediately
after [DISC ACCESS] disappears from
the screen. You do not need to proceed
to steps after step 5.
Inserting a disc
Disc cover OPEN
switch
Pickup lens
When the disc cover opens slightly, open it
further.
ACCESS lamp (Disc)
Set the disc with the label side facing out when
using a single-sided disc.


