


64
Setting the Time Data
Chapter 4 Adjustments and Settings for Recording
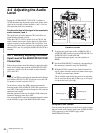
When you have operation of the MIC LEVEL control and
LEVEL (CH-1/CH-2) controls linked together, if the
LEVEL (CH-1/CH-2) controls are set to 0, the audio
signals on channels 1 and 2 cannot be recorded. Check the
position of the LEVEL (CH-1/CH-2) controls before
adjusting the MIC LEVEL control.
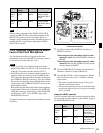
4-4-3 Input level of audio channels
CH-3 and CH-4
The levels of the audio signals recorded in audio channels
CH-3 and CH-4 are automatically adjusted or fixed. You
cannot adjust them manually.
You can select the audio signal to be recorded in audio
channels CH-3 and CH-4 using the AUDIO IN CH-3 and
CH-4 switches.
To adjust the audio recording level
Set AU CH34 AGC MODE on the AUDIO-2 page of the
MAINTENANCE menu as follows:
For automatic adjustment: Set to STREO or MONO.
To fix the level: Set to OFF.
The XLR connector automatic detection function does not
affect audio signals recorded on audio channels CH-3 and
CH-4.
Audio signals to be recorded on audio channels 3 and 4
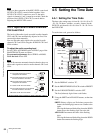
4-5 Setting the Time Data
4-5-1 Setting the Time Code
The time code setting range is from 00 : 00 : 00 : 00 to 23
: 59 : 59 : 29 (hours : minutes : seconds : frames) for the
DVW-970, and from 00 : 00 : 00 : 00 to 23 : 59 : 59 : 24 for
the DVW-970P.
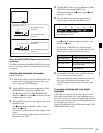
To set the time code, proceed as follows:
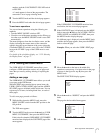
Setting the time code
1
Set the DISPLAY switch to TC.
2
Set the PRESET/REGEN/CLOCK switch to PRESET.
3
Set the F-RUN/SET/R-RUN switch to SET.
The first (leftmost) digit of time code flashes.
4
Using the SHIFT and ADVANCE buttons, set the time
code.
SHIFT: Selects a digit to set. Each time you press the
button, the flashing digit moves one column to the
right.
Pressing this button while holding down the HOLD
button moves the flashing digit one to the left.
ADVANCE: Increments the value of the flashing
digit.
Pressing this button while holding down the HOLD
button decrements the flashing digit.
Note
Note
F: The audio signal from the front
microphone is recorded.
F: Same as with the CH-3 switch.
R: The audio signal input to the AUDIO
IN CH1 connector is recorded.
W:The audio signal of the wireless
microphone is recorded.
R: The audio signal input to the AUDIO
IN CH2 connector is recorded.
W:Same as with the CH-3 switch.
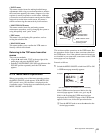
1
4
2
3,5
CUE IN
CH-1
MIX
CH-2
RESET button
HOLD button