


7
Chapter 7 Location and Function of Parts and Controls 130HDC-900/950/930 Series Product Information Manual
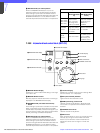
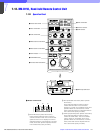
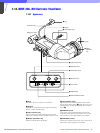
A REW (rewind) button (amber illumination):
Press this button to start a rewind operation. The
button is illuminated.
B F FWD (fast forward) button (amber
illumination): Press this button to start a fast-
forward operation. The button is illuminated.
C START/STOP button (red illumination): Press this
button to start a recording operation. The button
is illuminated. Pressing this button when it is
illuminated stops the VTR recording.
D STOP button: Press to stop a rewind, fast-
forward or playback operation.
E PLAY button (amber illumination): Press this
button to start a playback operation. The button
is illuminated.
F REC REVIEW (recording review) button
(amber illumination): Press this button to
execute a recording review operation. The
button is illuminated.
Notes
• When the START/STOP button is illuminated,
the other buttons in the VTR control block are
deactivated. To activate the other buttons, first
press the START/STOP button to cancel the
Recording mode.
• Some of the VTR control functions of this unit
may be disabled depending on the
combination of camera and VTR. For details,
ask your official Sony representative.
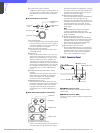
j OUTPUT selector
Selects the output signal from the connected camera.
CAM: Picture output
BARS: Color bar signal
TEST: Test signals for a video circuit check (the signal
is selected using the RM Configuration Menu). See
‘Settings on the RM Configuration Menu’.
k GAIN (master gain) selector
Selects the video gain from three values (LOW, MID,
HIGH) according to the illumination of the subject to be
shot. Normally, these three gain settings are those
chosen in the camera set-up. Alternative gain settings
may be defined by using the configuration menu of the
RM-B150 Operation Panel. See ‘Settings on the RM
Configuration Menu’.
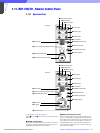
l MENU operation block
A Menu display (8 columns)
In normal operation mode, the display
illuminates to show the shutter speed, ECS
frequency or S-EVS value only when the shutter
control block is operated. When you select the
RM Configuration menu, the display shows
menu items, set values, and various information
depending on operations.
B RM Configuration switch
Selects the RM Configuration menu. When this
switch is pushed in the V direction, the ‘Basic
menu’ is selected.
When this switch is pushed in the V direction,
while holding the CANCEL/ENTER switch at
ENTER, the ‘Detail menu’ is selected. The RM
Configuration menu is switched off by pushing
this switch in the v direction.
C DISPLAY switch
For control of the camera’s menu.
ON: Shows the character display function of the
camera.
OFF: Shows the character display function of
the camera.
MENU: Sets the camera into the camera menu
mode.
D CANCEL/ENTER switch
To register or cancel a menu item or value
selection.
E Menu select knob (rotary encoder)
In normal operation, the shutter speed, ECS
frequency or S-EVS value can be adjusted with
this knob. In the camera’s menu mode the knob
is used for camera menu operations. On the RM
Configuration menu, turn the knob to select
menu categories, subcategories, set items, set
values and other information on the menu
display.
For operations on the RM Configuration menu,
see ‘Settings on the RM Configuration Menu’.
For operations on the camera’s menu, refer to
the Operation Manual of the camera or the
System Manual.
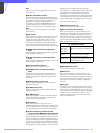
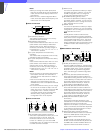
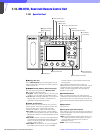
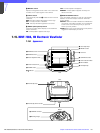
7-12-2 Connector Panel
a CAMERA connector (8-pin)
Connect to the camera using the supplied remote
cable.
b MONITOR connector (BNC)
Connect to a color monitor to observe the signal from
the camera.
12
34 5
SELECT
DISPLAY
ON
OFF
MENU
CANCEL ENTER
MENU
CAMERA MONITOR
1 CAMERA connector
2 MONITOR connector