


Others
Using the Custom Homepage Installer
82
The camera does not support use of images that do not
conform to the above conditions.
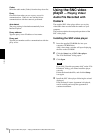
1
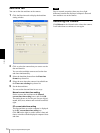
Click File open on the Main tab.
The File dialog opens.
2
Select the image you have prepared.
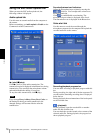
3
Select the view angle of the image to be created in
Angle setting.
To limit the pan/tilt range of the camera to the
selected view angle, check the Lock check box.
4
Click Send to transmit the prepared image to the
camera.
The image is saved in the camera.
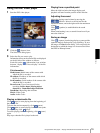
You can use the saved image when you control panning
and tilting from the main viewer.
Tip
The panorama image is the still image converted from
the image taken when you were going to create a
panorama image with “SNC panorama creator”. When
the camera is moved or when the layout around the
camera is changed, create the panorama image again.
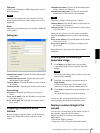
Using the Custom
Homepage Installer
The supplied Custom Homepage Installer allows you to
store the homepage that you have created in the camera
and watch it.
Notes on creating the homepage
When you are creating the homepage, note the following
points.
• The file name should be typed using up to 24
characters including the extension.
• The file size of the homepage should be 2.4 MB or
less.
• To see the created homepage, set the Homepage in the
System menu.
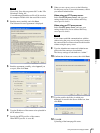
Uploading the homepage to the
camera using the Custom
Homepage Installer
1
Insert the supplied CD-ROM disc into your
computer CD-ROM drive.
After a short time a window will open displaying
the files on the CD-ROM.
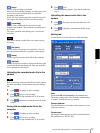
2
Click the Setup icon of Custom Homepage
Installer.
The “File Download” dialog opens.
3
Click Open.
The installer starts and notes are displayed.