


Preparation
Supplied Accessories / Connections
6
Preparation
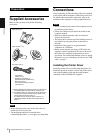
Supplied Accessories
Make certain you have received the following
accessories:
Notes
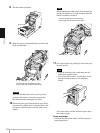
• When taking the printer out of the carton box, be
careful not to hurt your back.
• The packaging materials are needed when
transporting the printer, so we suggest you keep them.
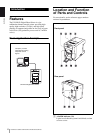
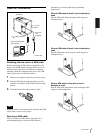
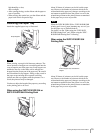
Connections
After connecting a USB connecting cable (not supplied)
to the printer and the computer, connect the power cord.
For details about the printer connection, refer to the
manuals for the computer or other peripheral devices.
Notes
• Before connecting the printer to the computer, be sure
to install the printer driver.
• Follow the connection procedures described in the
computer manual.
• Make sure that the interface cable is connected
securely at both ends.
• The printer drive software provided with the printer is
not suitable for using the printer connected to a
network.
• Operation of the printer is not guaranteed for
connection to a USB hub.
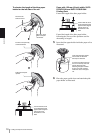
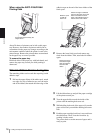
• Before connecting the unit using a USB cable (not
supplied), attach a supplied ferrite core to the end of
the cable to be connected to the printer for noise
prevention. For detailed information on how to attach
the ferrite cores, see “Attaching a ferrite core to a USB
cable” on page 7.
Installing the Printer Driver
Install the printer driver provided with the printer. For
detailed instructions on how to install the printer driver,
refer to the Readme.txt file and the install manual
contained on the CD-ROM disc supplied.
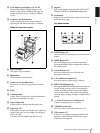
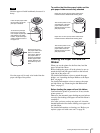
Paper Tray
a)
(1)
AC power cord (1)
Paper holders
b)
(2)
CD-ROM (1)
Ferrite core (1)
Operating Instructions (1)
Software License Agreement (1)
Warranty Card (1)
Service and Customer Support
Information (1)
a) Before attaching the paper tray, be sure to remove the
corrugated paper from the inside of the paper tray.
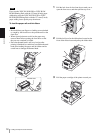
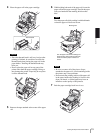
b) The paper holders are stored in the printer. Be sure to
remove the two paper holders from the inside of the
printer before turning the power on.
For details on how to remove them, see step 1 of
“Attaching the Paper Holders to the Paper Roll” on
page 8