


22
GB
Table of
contents
Sample
images
Menu Index
1 MENU button t [Brightness/Color] t [White Balance] t desired mode.
2 As necessary, [Option] t adjust the color tone.
Adjusting it toward + turns the image reddish and adjusting it toward – turns the image
bluish.
1 MENU button t [Brightness/Color] t [White Balance] t [C.Temp./
Filter].
2 [Option] t desired value.
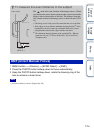
1 MENU button t [Brightness/Color] t [White Balance] t [Custom
Setup].
2 Hold the camcorder so that the white area fully covers the AF area
located in the center, and then press the PHOTO button down.
The shutter clicks and the calibrated values (color temperature and color filter) are displayed.
3 To call the custom white balance setting, MENU button t [Brightness/
Color] t [White Balance] t [Custom].
• If a flash (sold separately) is used when the PHOTO button is pressed, a custom white balance is
registered with the flash light taken into account. Take pictures with flash in later still image shootings.
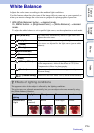
Preset white balance ( )
C.Temp./Filter
Color Temp. The higher the number, the more reddish the image, and the
lower the number, the more bluish the image. (The default
setting is 5500 K.)
Color Filter Based on using the set color temperature as the standard, the
color can be compensated to G (Green) or M (Magenta). The
higher the number, the more the color is compensated. (The
default setting is 0.)
Custom white balance
Note