


Instruction Manual
6
Push-Button Control and LEDs
A push-button on the respective top panel of Local Unit and Remote Unit can be used
to select the control mode.
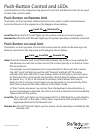
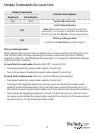
Push-Button on Remote Unit
The button on the top panel of Remote Unit can be used to switch mode between
Local and Remote in the sequence as the diagram shown below:
Local On: When the LED “Local” lights up, the system controls its local computer.
Remote On: When the LED “Remote” lights up, the system remotely controls the Local Unit.
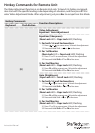
Push-Button on Local Unit
The button on the top panel of Local Unit can be used to switch mode among Local,
Remote, and Auto in the sequence as the diagram shown below:
Auto: The LEDs “Remote” and “Local” ash alternatively, the system is now waiting for
the Remote or Local Unit to take control. The control priority is on the rst come,
rst served basis.
For example, once the keyboard or mouse attached to the Local Unit is active,
the LED “Local” will light up and the LED “Remote” will light o. This status
indicates that the Local Unit is now taking control of the system, and vice versa
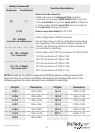
for Remote Unit. In Auto mode, the duration of latch time for taking control can
be preset to 5, 15, 30, or 60 seconds via hotkeys, which allows the Local or
Remote Unit to resume control again via any keystroke or mouse activity if the
latch time is due and the status returns to the “Auto” mode.
In “Auto” mode, whenever, any activity from the keyboard, mouse buttons or
mouse scroll wheel is detected, the Unit (Local Unit or Remote Unit) immediately
takes control of the system.
Local On: The LED “Local” lights up, the connected PC (or KVM Switch) is controlled by
the Local Unit. In this case, 3 LEDs (Num, Caps and Scroll Lock) ash on the
keyboard attached to the Remote Unit.
Remote On: The LED “Remote” lights up, the system can be remotely controlled by the
Remote Unit.
Local On Remote On
Auto Local On Remote On