


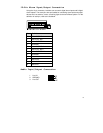


23
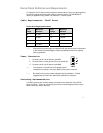
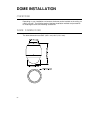
Installation with Ceiling Flush Mount Kit
The Ceiling Flush Mount Kit consists of three pieces: the in-ceiling mount, the camera
bracket, and the trim ring.
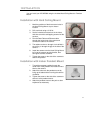
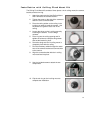
1. Attach the camera to the Hard Ceiling Mount
that is affixed to the camera bracket.
2. Tighten the screw on the side of the camera to
secure it to the camera bracket.
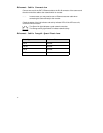
3. Place the ceiling sticker on the ceiling in the
location you want to install the camera. Use
the sticker as a guide to cut a hole in the
ceiling.
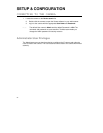
4. Loosen the wings on the in-ceiling mount by
loosening the screws. Turn the wings
outward.
5. Place ring into the ceiling opening and fix
tighten the screws to clamp the wings down
and set the bracket in place.
6. Screw the wings until the in-ceiling mount is
completely flush with the ceiling.
7. Run the necessary cables through the center
hole of the camera bracket and connect them
to the camera.
8. Align the camera bracket with the in-ceiling
mount and set into place.
9. Use the included screws to attach the two
components.
10. Clip the trim ring to the in-ceiling mount to
complete the installation.