


Installation and Operation Guide
65
5.1.8 PPPoE & DDNS
Using the PPPoE
1. Install the XDSL software (obtained from your ISP dealer) in your PC.
2. Search for your IP camera's IP address: you can connect the IP camera and the Video
monitor. The monitor screen will show the IP address on its right side.
3. Change the switch on the IP camera's side panel to position # 4.
4. Installing an IP address in your PC or notebook.
Desktop → Move the cursor to the Network neighborhood and right click the mouse →
Choose the properties → Choose your local connection → Choose the properties and select
the configuration → Select the TCP / IP → Choose the properties → Enter the IP address in
a four-part format, for example “192. 168. 1.101” (the first three parts must be identical to the
above numbers, only the last part can be changed to your own number, which must never
exceed 255) → Click on the mask and the mask input, namely “255. 255. 255. 0” (a fixed
formula) → Click “OK” → Click “OK”.
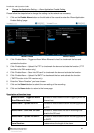
5. Desktop → Choose IE browser → Enter the IP camera IP address in the URL (check step #
2 above) → Enter → IP camera images will appear.
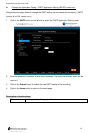
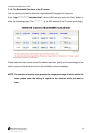
PPPoE Settings
1. Enter the IP camera home page → Choose the network → Enter “User Name: admin” and
“Password: 9999” → Click “OK’.
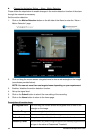
2. Choose PPPoE → PPPoE mode: Select “ON” → Enter “Account” → Enter “Password” →
Submit → Unplug the power connection.
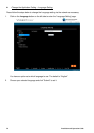
3. Plug in the IP camera and it will receive an IP address from the ISP dealer (this IP address
is dynamic --- every time you unplug and plug in again you’ll get a new IP address).