


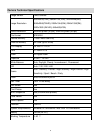
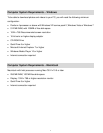
10
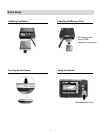
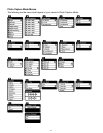
Setting the ViviLink Default Option
Once the Date and Time have been set, you will be asked to set the default ViviLink destination
for photos and videos taken with your camera.
The ViviLink technology allows you to quickly and easily upload your camera‟s photos and videos
to the social networks of your choice with the accompanying software application.
1) First you will be asked to choose the default ViviLink social network for Photos. Highlight the
desired default social network and press the SET button to confirm the selection.
2) Next you will be asked to choose the default ViviLink social network for Videos. Highlight the
desired default social network and press the SET button to confirm the selection.
3) After the ViviLink Video option is confirmed the camera is now ready to use.
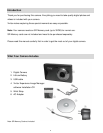
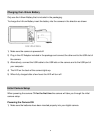
Using Your Digital Camera
Make sure the batteries have been inserted properly into your digital camera. If your camera
comes with a rechargeable lithium battery, make sure it is fully charged before the first use.
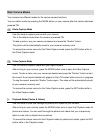
Powering the camera ON
Press the Power button to turn your camera ON. The camera will be in Photo Capture mode
to start.
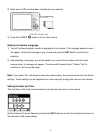
Powering the camera OFF
While the camera is on, you can press the Power button again at any point to turn your
camera OFF. You will see a “Goodbye” splash screen and then the camera will power off
completely.
Note: your digital camera also has an Auto Power Off feature that will automatically turn off your
camera after a specific period of time that your camera is left idle. The Auto Power Off settings
can be set from the Auto Power Off settings menu.