


AXIS V5915 PTZ Network Camera
Video and Audio
• When setting up recording using action rules. See Events on page 34.
• When setting up continuous recording. See Continuous Recording on page 40.
• In the Live View page – select the stream prole from the Stream prole drop-down list.
For quick setup, use one of the predened stream proles. Each predened prole has a descriptive name, indicating its purpose. If
required, the predened stream proles can be modied and new customized stream proles can be created.
To create a new prole or modify an existing prole, go to Setup > Video & Audio > Stream Proles.
To select a default stream prole for the Live View page, go to Setup > Live View Cong.
Camera Settings
The Video & Audio > Camera Settings page provides access to advanced image settings for the Axis product.
Capture Mode
To change capture mode, follow these steps:
1. Go to Setup > Video & Audio > Camera Settings.
2. Select the new capture mode.
3. Click Save.
Note
When the capture mode is set the camera will reboot which means it will be ofine for approximately two minutes.
Image Appearance
To change Image Appearance go to the menus under Setup > Video & Audio > Camera Settings.
Increasing the Color level increases the color saturation. The value 100 gives maximum color saturation and the value 0 gives
minimum color saturation.
The image Brightness can be adjusted in the range 0–100, where a higher value produces a brighter image.
Increasing the Sharpness can increase bandwidth usage. A sharper image might increase image noise especially in low light
conditions. A lower setting reduces image noise, but the whole image will appear less sharp.
Use Rotate image to rotate the image 180°. This can be useful if the camera is mounted on a ceiling and the video is upside down.
The rotation will be applied to all video streams, over network, HDMI and SDI.
White Balance
To change this setting go to Setup > Video & Audio > Camera Settings
White balance is used to make colors in the image appear the same regardless of the color temperature of the light source. The Axis
product can be set to automatically identify the light source and compensate for its color. Alternatively, select the type of light
source from the drop-down list. For a description of each available setting, see the online help .
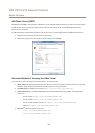
Select Manual to display the One-click White Balance button. Click Save to activate the button.
To set the white balance, make sure that a white object in correct lighting conditions is occupying more than half the image
and click One-click White Balance.
20