


22 en | Navigating the Menus MIC Series 500 Camera
F.01U.173.601 | 2.0 | 2010.11 User’s Manual Bosch Security Systems, Inc.
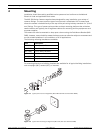
5 Navigating the Menus
The MIC 500 Series Camera is programmed through the on-screen display (OSD) menus. Each
displays a list of parameters or submenus that you can select. To access the main menu, use
one of two (2) methods:
– PC-based control system where you must identify preset command 85.
– Manual control via a compatible joystick
If the control system does not support presets or is limited to a preset number less than 85,
tilt the unit upward until it hits the mechanical stop point, and then hold the joystick for
approximately 10 seconds. The menu appears. To access the main menu via manual control:
1. Press Shot + 85 + Enter (Bosch controller). The main menu appears.
2. If this is the first time that you are using the camera, or if it is locked, you must enter the
password to access all menu options.
3. Move the joystick down to ENTER PASSWORD, then move it to the right to enter the sub-
menu. PASSWORD “0000” appears.
4. Move the joystick to the right. The “0000” turns green and the first number starts to
blink.
5. Move the joystick up to change the first “0” to a “1”. The password should now be
“1000,” which is the only valid password and can never be changed.
6. Move the joystick to the left to exit the menu. PASSWORD VALID appears.
– Tips to remember when navigating throughout the menus via the control:
– If the menu receives no manual controls for three (3) minutes, it automatically
closes, returning the camera to its previous state. Any settings not saved are lost.
– Menu items appear in white, with the current item highlighted in either blue or
green. If a line is highlighted in blue, use the up and down commands to move
through the menu. If the line is highlighted in green, use the up and down commands
to scroll through the settings for that option.
For numbers, move the joystick up to increase the numbers, and down to decrease
the numbers. Move the joystick left and right to move between numbers.
– A right command can do one of two things: Move into the current option displaying
all the options available, or select the current option by changing from blue to green,
allowing the user to select a new value for this setting.
– A left command goes back a menu level or sets the setting that you just modified.
– Up and down commands scroll through the list and right to move into the next level
of the menu. Pressing right on EXIT turns off the menu.
– For some menu items there are slight differences. For example, the Set-up Tour and
Sony Set options from the main page request a number before moving into the
settings. This sequence is: Select SETUP TOUR, then send right. Use the up and
down to move between tour numbers, and then right again to enter the tour sub
menus. The contents of the first screen is dependent on the level of user access
defined by the installer under the password locked section of the menu.
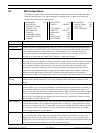
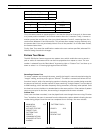
MAIN MENU 1/2 MAIN MENU 2/2
MIC SETUPS SONY SET
ACTIVATE FEATURE CAPTIONS
PRESET TOUR PRIVACY
PATTERN TOUR POT TEST
PRESETS MIC INFORMATION
COMMUNICATIONS SET USER ACCESS
ADVANCED SETUPS HELP
ALARMS EXIT