


Clearing Paper Jams
3-3
Troubleshooting
3
1
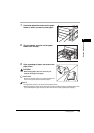
Inspect all paper jam locations indicated on the touch panel display, and
remove any jammed paper.
See the appropriate pages below for instructions on finding and removing jammed paper. Or, you can
follow the instructions on the touch panel display.
If jammed paper tears while it is being removed, be sure to remove any remaining pieces from inside
the machine.
IMPORTANT
•
If the machine's power is turned OFF when there is a paper jam, detection of paper jams in the paper
drawers is not possible after the power is turned back ON. Clear paper jams without turning the power
OFF.
•
If a paper jam occurs in the optional Feeder (DADF-K1), you cannot continue operating the machine.
Follow the directions on the touch panel display to clear the paper jam. (See "Feeder (DADF-K1)
(Optional)," in the Reference Guide.)
•
If the MEAP screen is displayed, a message appears in the Job/Print monitor area. Press [System
Monitor], and follow the procedures that appear on the touch panel display to help you remove the
jammed paper.
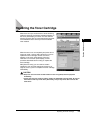
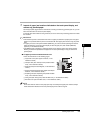
● If a paper jam occurs inside the main unit:
❑ See the instructions on the following pages.
a Upper Left Cover (See "Upper Left Cover," in the
Reference Guide.)
b Transport Unit (See "Transport Unit (Inside the Main
Unit)," in the Reference Guide.)
c Stack Bypass (See "Stack Bypass," in the Reference
Guide.)
d Right Cover/Paper Drawers (See "Right Cover/Paper
Drawers," in the Reference Guide.)
e Duplexing Unit (See "Duplexing Unit (Inside the Main
Unit)," in the Reference Guide.)
f Fixing Unit (See "Fixing Unit (Inside the Main Unit)," in the Reference Guide.)
g Exit Slot Cover (See "Exit Slot Cover," in the Reference Guide.)
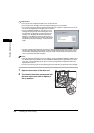
NOTE
Some areas that are shown to have paper jams may not actually have paper jams. However, always
check all locations indicated on the touch panel display in the order that is given.