


SHORT COURSES (HTTP://WWW.SHORTCOURSES.COM)
19
white balance icon bar on the monitor. (The first time you
press it, you display the exposure compensation scale.)
3. Press the right or left point on the Omni Selector to high-
light the icon for the white balance mode you want to use
(AWB is the default). If you select the Custom icon (at the
far right end of the bar), aim the camera so a white piece of
paper or photographic gray card fills the viewfinder or
monitor and press * (asterisk).
4. Do one of the following:
■ To use the setting for a number of shots, press the SET
button.
■ To use the setting for just a few photos, press the shutter
button to take the pictures. When the photos are saved and
the icon bar reappears, press the right or left point on the
Omni Selector to select another mode.
5. When finished, repeat Steps 1–4 to reset white balance to
AWB (automatic white balance) or the current setting will
be remembered.
ZOOMING THE LENS
To zoom the lens, press zoom lever to the left (counterclockwise)
to zoom out and to the right (clockwise) to zoom in. The monitor
and viewfinder zoom along with the lens so they show just the
area that will appear in the photograph.
TURNING DIGITAL ZOOM ON AND OFF
1. With the camera and monitor on, set the Mode Dial to any
mode other than Pan Focus, Stitch Assist or Movie. Also,
you can’t being using the RAW file format.
2. Press MENU and then press the up or down point on the
Omni Selector to highlight Digital Zoom.
3. Press the right or left point on the Omni Selector to select
On or Off (the default) and press MENU to confirm the
setting and hide the menu.
USING DIGITAL ZOOM
To use digital zoom when it’s turned on, press the zoom lever to
zoom all the way in on a subject. Release the zoom lever, and
then press it again to zoom into digital zoom, up to 11x.
© COPYRIGHT 2001 BY DENNIS P. CURTIN
20
USING AUTO FLASH
1. With the camera on and in shooting mode, set the Mode
Dial to any mode other than Stitch Assist, Movie, Tv, Av, or
M.
2. Press the Flash button (a lightning bolt icon) until no flash
icon is shown on the display panel a lighting bolt with the
letter “A” is displayed on the monitor.
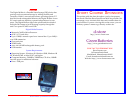
COMBATING REDEYE
1. With the camera on and in shooting mode, set the Mode
Dial to and mode except Stitch Assist or Movie.
2. Press the Flash button (a lightning bolt icon):
■ When the redeye reduction icon (an eye) is displayed by
itself, the flash is on auto and will fire only in dim light.
This flash mode isn’t available in Movie, Tv, Av, M, or Stitch
Assist. In Auto, Portrait, night scene, and color effects, this
is the default mode.
■ When the icon is displayed along with a lightning bolt
icon, the flash is in redeye/flash on mode and will fire
regardless of the ambient lighting (fill flash). This flash
mode is not available in Auto, Stitch Assist, or Movie
modes.
USING FILL FLASH
1. With the camera on and in shooting mode, set the Mode
Dial to any mode other than Auto or Movie.
2. Press the Flash button (a lightning bolt icon) until the flash
on icon (also a lightening bolt) or redeye reduction/flash on
icon (a lightning bolt and eye) is shown on the display
panel and monitor.
TURNING THE FLASH OFF AND ON
1. With the camera on and in shooting mode, set the Mode
Dial to any shooting mode. In landscape and movie mode,
the flash is automatically turned off, but in landscape you
can turn it on if you want.
2. Press the Flash button (a lightning bolt icon) until the flash
off icon (a lightening bolt with a slash through it) is shown
on the display panel.