


EPSON Stylus COLOR 800
1/97
EPSON Stylus COLOR 800 - 11
4. In the Spool Manager window, double-click the queue you
want to use for network printing. The Queue Setup dialog
box appears.
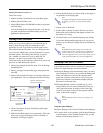
5. Click the Remote Despool tab and then click the Printing
from remote queues option.
6. Click the Browse button and select the remote server
directory that will receive journal files.
7. Click OK and minimize the Spool Manager.
Setting Up Remote Systems
Follow these steps to set up computers on the network:
1. Create an icon for the EPSON Spool Manager
(EPSPLMGR.EXE in the \WINDOWS\SYSTEM folder
or directory).
2. Open the Spool Manager window as described on page 7.
3. In the Spool Manager window, double-click the queue you
want to use for network printing. The Queue Setup dialog
box appears.
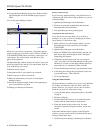
4. Click the Spool to remote printer button.
5. Click the Browse button and select the directory you’re
using for journal files on the host system.
6. Click OK and minimize the Spool Manager.
Setting Up Your Network Path in Windows 95
If you want to use your printer on a network running
Windows 95, you need to set up the port and network path
on the computer connected to the printer. Follow these
steps:
1. Double-click My Computer.
2. Double-click the Printers folder.
3. Right-click the EPSON Stylus COLOR 800 icon and
choose Properties.
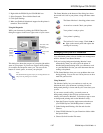
4. Click the Details tab.
5. Click the Add Port button, then specify the network path
to the printer and click OK.
6. Open the Spool Manager window as described on page 7.
7. In the Spool Manager window, double-click your printer’s
queue. The Queue Setup dialog box appears.
8. Make sure the Use Print Manager for this port option is
checked. Then click OK.
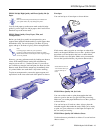
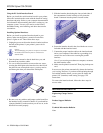
Network Printing on a Macintosh
If you want to use your printer on an AppleTalk
™
network,
you need to install one of the optional interface boards:
either the LocalTalk
™
board or the Ethernet
™
board. See
page 17 for more information about optional interfaces.
Then you can use the EPSON Namer utility and set up your
printer in the Chooser. The EPSON Namer was installed on
your hard drive along with the other printer software.
Assigning a Name to the Printer
Follow these steps to use the EPSON Namer utility:
1. Double-click the EPSON Namer icon on your hard drive.
2. Click the EPSON Stylus(AT) icon in the Device Types
window.
3. Select the zone where your printer is located.
4. Under New Name, type a name for your printer to
distinguish it from other printers on the network.
5. Click Rename and then click Done.
Using the AppleTalk Connection
Make sure your printer is turned on and then follow these
steps to set up your printer on an AppleTalk network:
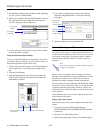
1. Open the Chooser from the Apple menu.
2. Click the EPSON Stylus(AT) icon.
3. Select the AppleTalk zone you want to use. A list of all
printers connected to the selected zone appears on the
right.
4. Click the name you assigned to your EPSON Stylus
COLOR 800. You see a prompt asking you to confirm
your choice.
5. Click OK.
If your printer name doesn’t appear, make sure the printer
is turned on and correctly connected, then click RETRY.
6. To ensure compatibility, leave Background Printing
turned off.
7. Close the Chooser when you’re finished.