


EPSON Stylus COLOR 800
18 -
EPSON Stylus COLOR 800
1/97
Using the PC Serial Interface Board
Before you install the serial interface board in your printer,
follow the instructions that come with the board for setting
baud rate and parity. Refer to your computer documentation
for information about matching the board’s settings to your
computer system. You may also need to set the board’s
handshake timing, error handling, and other data transfer
conventions.
Installing Optional Interfaces
Before you install an optional interface board in your
printer, make sure the printer is turned off and all the
printer’s lights are off. Then follow these steps:
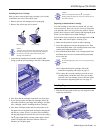
1. Unplug the power cord from the electrical outlet (and from
the back of the printer, if your printer’s power cord is
removable).
Caution:
To avoid damaging your printer or computer, do not install
the interface board when the printer is connected to an
electrical outlet.
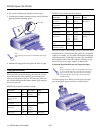
2. Turn the printer around so that its back faces you, and
disconnect any interface cables.
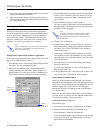
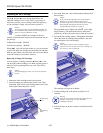
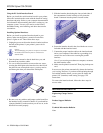
3. Use a cross-head screwdriver to remove the two screws
securing the shield plate to the interface slot; then lift off
the plate. Be sure to keep both screws; you may need to
use them again when you reinstall the shield plate.
4. Be sure to set any switches and jumpers on the board. See
the interface board’s manual for details. If your board has
a jumper labeled JG, make sure that you set it to on, or the
board will not work properly.
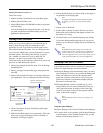
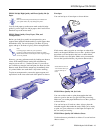
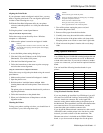
5. Slide the interface board along the slots on both sides of
the compartment. Push it in firmly to fully insert the
board’s connector into the printer’s internal socket.
6. Secure the interface board in the slot with the two screws
included with the interface board.
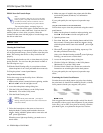
7. Connect the proper interface cable to the interface board
and to your computer. If the cable has a grounding wire,
connect it to one of the screws securing the parallel
interface.
Also, if you are using more than one computer, reconnect
the other interface cable.
8. Make sure the printer is turned off. Then plug in the power
cord.
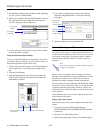
In most cases, the printer automatically detects the interface
you’re using. However, if you have trouble printing through
an installed interface board, you may need to change the
printer’s I/F (interface) mode setting. See page 5 for
instructions.
To remove the interface board, follow the above steps in
reverse order.
Information Reference List
Engineering Change Notices
None
Product Support Bulletins
None
Technical Information Bulletins
None