


32
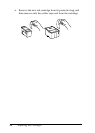
Maintenance and Transporting
Aligning the Print Head
If you notice vertical lines are not aligned properly, you may be
able to solve this problem by aligning the print head.
Follow the steps below to align the print head using the Control
Panel.
1. Make sure that this product is on and the
Error
light is off.
2. Load a few sheets of A4 size paper in the sheet feeder.
3. Press one of the
Menu
buttons repeatedly until Head
Alignment appears on the LCD panel, and then press the
x
Color Copy button.
This product prints the adjustment patterns.
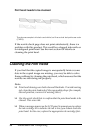
4. After printing, select the set number that has the smallest gaps
in the #1 pattern, and then press one of the
Copies/Value
buttons to display the number for that set.
5. Press the
x Color Copy button to register the set number. The
next pattern number appears. Repeat steps 3 and 4.
After all three patterns are set, the print head alignment is
completed.
Note:
Pressing the
y
Stop button stops the print head alignment.