80 81
Settings
4
■ SET-UP menu options
IMAGE DISP.
1
2
3
4
ON/OFF ON
Specifies whether the preview images (the photographed
images) are displayed after taking a picture.
–
82
82
–
–
15
83
85
96
95
101
85
–
16
–
–
POWER SAVE
2 MIN/5MIN/OFF 2 MIN
Reduces the camera’s power consumption and
subsequently turns the camera off when not being used.
FORMAT OK – Erases all files.
§ BEEP
OFF/1/2/3 2
Sets the volume of the tone emitted when the camera
controls are used.
§ SHUTTER
OFF/1/2/3 2
Sets the volume of the sound emitted when the shutter operates.
DATE/TIME SET – Corrects the date or time.
TIME
DIFFERENCE
SET – Specifies the time difference settings.
FRAME NO. CONT./RENEW CONT.
Specifies whether frame numbers are assigned
consecutively from previous numbers or begin again.
USB MODE
¶/qWEB/®
¶
¶
: DSC (Mass storage device) mode
This mode provides a simple way to read images from an xD-
Picture Card and store images onto an xD-Picture Card.
q WEB: WEB CAM (WEB Camera) mode
This function allows you to conduct videoconferencing
sessions between PCs connected to the Internet.
✽ Windows XP SP1 only
®: PictBridge
If a printer that supports PictBridge is available, images can
be printed by connecting the camera directly to the
PictBridge-compatible printer without using a PC.
~
CCD-RAW
OFF/ON OFF
Sets the image quality to CCD-RAW. Because no image
processing is performed on the camera for CCD-RAW
images, images must be processed on a PC.
AF
ILLUMINATOR
ON/OFF ON Specifies whether the AF-assist illuminator is ON or OFF.
–
ZOOM
POSITION
RESET/RESUME RESET
Specifies whether the position of the lens is recorded when
the camera is turned off. The lens moves to the recorded
position when turning the camera on again.
/ENGLISH/
FRANCAIS/DEUTSCH/
ESPAÑOL/ITALIANO/
ENGLISH Specifies the language used for screen display.
VIDEO SYSTEM
NTSC/PAL – Specifies whether video output is set to NTSC or PAL.
109
DISCHARGE
OK – Discharges rechargeable batteries.
q RESET
OK –
Resets all the camera settings (other than the DATE/TIME,
TIME DIFFERENCE, LANG. and VIDEO SYSTEM) to the
factory default values set at shipment. A confirmation
message appears when you press “c”. To reset the camera
settings, press the “MENU/OK” button again.
Settings Display
Factory default
Explanation
page
1
2
3
4
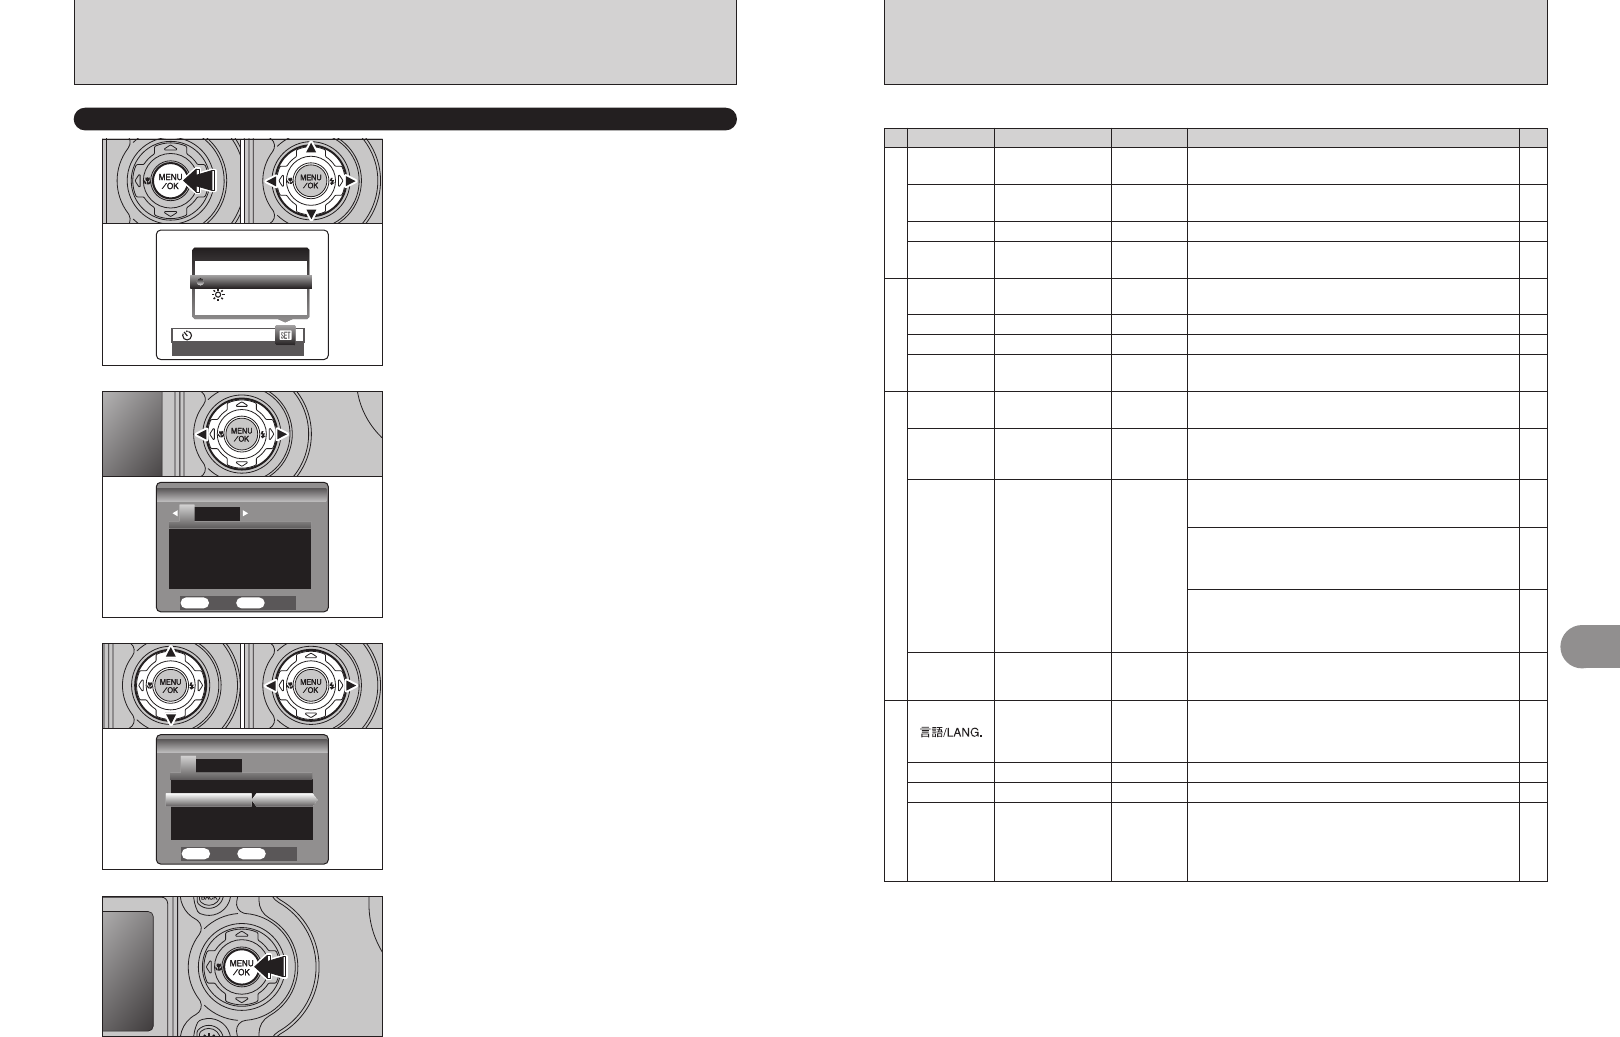
1Press the “MENU/OK” button to display the
menu on the screen.
2Press “d” or “c” to select “F” OPTION and
then press “a” or “b” to select “SET-UP”.
3Press the “MENU/OK” button to display the
SET-UP screen.
02
●
!
Always turn the camera off when replacing the batteries.
Opening the battery cover or disconnecting the AC power
adapter without turning the camera off may cause the camera
settings to revert to the factory default values set at shipment.
Press “d” or “c” to move to options 1 to 4.
After you have changed the settings, press the
“MENU/OK” button to confirm the changes.
1Press “a” or “b” to select a menu option.
2Press “d” or “c” to change the setting. Press “c”
for “FORMAT”, “DATE/TIME”, “TIME
DIFFERENCE”, “DISCHARGE” or “q RESET”.
F USING THE SET-UP SCREEN
01 03
01 02
SET-UP


