


SKU 94634 For technical questions, please call 1-800-444-3353 PAGE 15
MIXING THE CONCRETE
It is extremely important to have a consistent mix. If it is too wet, it will slump. If it 1.
is too dry, it will crack.
The sand should be “rough sand”, not having gravel much larger than a match head. 2.
The sand should be free of dirt and debris.
Mortar sand is recommended. Do not use silica sand. Crystalline silica contains 3.
chemicals known (to the State of California) to cause cancer, birth defects or other
reproductive harm.
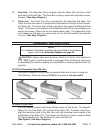
The finished mix should have a consistency similar to wet sand used on the beach 4.
to make sand castles. The following procedure is typically successful when mixing
in a mortar mixer (not included):
NOTE: The mix is 5 parts sand to 1 part cement.a.
With the mortar mixer running, dump in 2 five gallon buckets of sand.b.
Dump in 1/2 of a 94 pound bag of portland cement.c.
Add 3 more five gallon buckets of sand.d.
Add water until the mix reaches the proper slump. You should not be able to e.
squeeze water out of the mix. Do not over-mix.
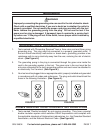
OPERATING INSTRUCTIONS
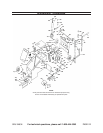
Operating The Curb Machine:
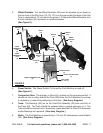
Wheel the Curb Machine to the starting point, and install the Front Pneumatic Tire 1.
(9) upside down or remove. (See Figure E.)
Place the front end of the Slip Form (1A, 1B, 1C) on the prepared ground where 2.
you desire the curb to begin. (See Figure E.)
Move the Rear Pneumatic Tires (9) so that the left Tire is in the trench. 3.
(See Figure E.)
Adjust the Wheel Brackets (28) so that the Curb Machine is level and the Slip Form 4.
(1A, 1B, 1C) is at the proper height. The front of the Slip Form should be on the
ground, and the rear approximately 1/4 inch above the ground.
(See Figure E.)
Make sure the Power Switch (14) is in its 5. “OFF” position. (See Figure E.)
Plug the Power Cord (19) into a proper extension cord. Then, plug the extension 6.
cord into the nearest 115 volt, grounded, GFCI-protected electrical outlet.
NOTE: It is recommended to use a 12 or 14 gauge extension cord, as it will carry
the electrical current more efficiently than a 16 gauge extension cord.
(See Figure C, and Assy. Diagram.)