


SKU 94634 For technical questions, please call 1-800-444-3353 PAGE 17
After the section has been extruded, remove the string and place it in line directly 3.
over the curb. Portions which are still not straight can be pushed into place with
the back of a shovel.
Installing Curved Curbing:
It is important for the control of the Curb Machine, as well as for the protection of 1.
the landscape, that you do not make curves too tight. Gentle curves look best, and
will allow you to be more efficient with the Curb Machine.
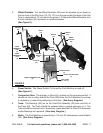
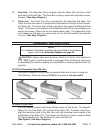
If you have a tight curve or circle, make sure to allow for the Curb Machine to oper-2.
ate properly by digging the trench a little wider. The extra clearance will allow the
Slip Form (1A, 1B, 1C) to make it around the curve. (See Figure G.)
Installing Circles:
The most critical part of a circle is a good radius or trench.1.
Locate the center point of the circle. Pull a string line, and mark the outside of the 2.
circle with spray paint or chalk. Then, dig the trench.
Place the Curb Machine in the circle and as it extrudes, help pull it around so that 3.
the back of the Slip Form (1A, 1B, 1C) doesn’t catch on the sod. Most circles smaller
than 6 feet in diameter will “break up” as you drive the machine.
As you reach the end of the circle, move the Rear Pneumatic Tires (9) more towards 4.
the middle of the circle and you will be able to extrude the concrete almost on top of
the beginning of the circle. You may wish to cut off and remove the first foot or two
of curbing, as it is likely the machine will move inward as you follow this process. As
you trowel the outside of the circle, use your hand on the inside to keep the concrete
together. Then, finish with an inside trowel (not included).
Finishing Into A Solid Object:
When installing curbing into a wall or other existing structure, the last two or three
feet will need to be finished by hand. To do so, pull the Curb Machine off. Shovel
some concrete onto the ground, hand pack it, and then shape it with a finishing
hand trowel.
Cutting Control Joints:
Control joints should be cut every 3 feet. If you are in an area where there is a lot 1.
of ground movement or freezing in the winter, control joints should be cut every 3
feet for the Mower’s Edge Style Slip Form (1A) and every 4 feet for the Curb Style
Slip Form (1C). This is done with a heavy bladed butcher knife (not included).
With a butcher’s knife, cut about halfway through the concrete before it sets, pulling 2.
the knife carefully out the front or back (usually within 15 to 30 minutes) after the
concrete is poured.