


63
Interval
options available
2 frames - 32 frames
options available
1 second - 24 hours
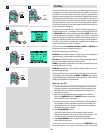
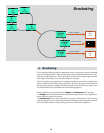
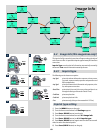
3 Interval
By using the interval setting, you can allow the camera to take a series of
exposures automatically over a set period. This is often required for time
and motion studies, security surveillance, nature study, etc. The exposure
and focus settings (Manual or Auto) will be according to the camera set-
tings at the time of exposure.
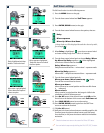
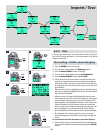
Interval setting
1) Press the MENU button on the grip.
2) Turn the front control wheel until Interval appears.
3) Press the DRIVE (Enter) button on the grip.
4) Turn the front control wheel to access the options, that are:
Number of exposures (the number of exposures re-
quired)
Interval duration (the time interval between the expo-
sures)
(e chosen symbol is indicated by a drop shadow)
5) In Number of exposures, turn the rear wheel to choose the
number of exposures required:
2 – 255
6) In Interval duration, turn the rear wheel to choose:
1 second – 24 hours
7) Press SAVE (DRIVE button) to save the setting.
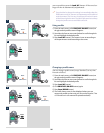
8) Press ENTER (DRIVE button) again from the Interval screen
to activate the function. Press On (AF button). Note that this
now reads Off and the line of text at the bottom of the screen
reads ‘Interval on’.
Half-press the shutter release button to standby mode for this
function (press the shutter release button again (full press) for
activation) or full-press the shutter release for immediate acti-
vation.
Check the lower text-row on the screen for ON or OFF status.
An Interval setting can be stopped mid-sequence by pressing the ESC
button.
1 2
3
4
5
6
7
8
Number of exposures high-
lighted. 2 frames variation
chosen as option.
Interval duration highlighted.
5 seconds variation chosen as
option.
Screen after Interval setting
activated indicating 3 shots re-
maining at 30 second intervals.
EXAMPLE
�
�
�
�
ON.OFF
(PROFILES/ESC)