


9
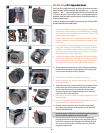
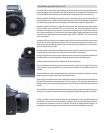
13. Rest the magazine retention groove on the magazine sup-
port on the camera body ensuring that they are correctly
positioned.
14. Swing the magazine towards the camera body and
firmly press into place with a click. If there is resistance, the
magazine retaining hook has probably been inadvertently
released. Push the magazine retaining latch to the right and
inwards simultaneously again to reset it.
15. Remove the top protective cover from the viewfinder screen
location by lifting a corner.
16. Remove the protective cover from the viewfinder by depress-
ing the viewfinder release button.
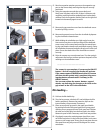
17. While holding the viewfinder at a slight angle, locate the
front section into place on the front edge of the viewfinder
screen recess in the camera body ensuring the central locat-
ing lug and databus interface are positioned correctly. Swing
the viewfinder downwards and press firmly until it clicks into
place. Ensure that both sides of the viewfinder are seated
correctly.
18. Point the camera at a smooth toned area. Turn the eyesight
adjustment dial until you achieve optimum sharpness of the
markings on the viewfinder screen.
..........................................................................
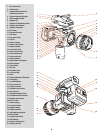
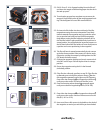
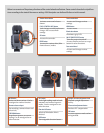
The camera is now complete. If you press the ON.OFF
button A for half a second, the camera will activate.
If the camera enters STANDBY mode (the LCD screen
will show the H2 symbol only), reactivate it by press-
ing the shutter release button B halfway (or the
ON.OFF button).
You can now explore the menus, buttons, control
wheels, etc observing the changes on the LCD on the
grip as well as the LCD in the viewfinder.
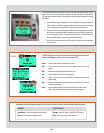
film loading ...
19. Fold out the film holder key.
20. Turn the key counter-clockwise 90° and withdraw the film
holder completely. (Remove the protective slip from the
internal battery compartment if necessary)
21. Place an empty take-up spool in the upper spool holder
by pushing one end of the spool against the sprung spool
retaining arm to engage the stud in the spool end. Position
the other end of the spool over the fixed stud in the holder.
Rotate the spool a little if necessary until clicks into position.
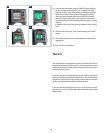
22. Completely remove the retaining paper band from a new
roll of film and place it in the lower spool holder in the same
manner as the empty spool. Ensure you do not place the new
film spool the wrong way around! See diagram for correct
orientation.
2
1
13
14
15
16
17
18
19
20
21
22
A
B