


65
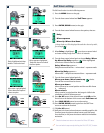
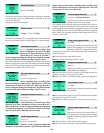
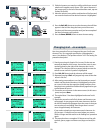
Standby timeout 1
• 5s • 10s • 15s • 30s
Determines the amount of time the camera remains active before
it automatically reverts to standby mode (indicated on the grip
LCD by the H2 logo).
Minimises battery consumption.
EV increment 2
• 1 Step • 1/2 Step • 1/3 Step
Determines the amount of EV change applied (per click of either the
front or rear control wheels) to either aperture or shutter speed.
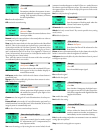
User button function 3
• None • Standby (enters standby) • Stop
Down• Flash Measure • Interval timer • Multi
Exposure • Self Timer • Bracketing • AF drive
(lens in MF or AF) • Mirror up • B mode • T
mode • Histogram (displays last histogram) • Grey balance expo-
sure • Cycle LM mode • Delete last image • Dig. foc. check
Sets which function will be immediately activated when the User
button is pressed (you cannot alter the setting in this mode though,
only use it). e button has a toggle function so that by pressing it
again the new setting will be de-activated.
AE-Lock button function 4
• AE-lock
but can be reassigned to:
• None • Standby (enters standby) • Stop
Down• Flash Measure • Interval timer • Multi Exposure • Self Timer
• Bracketing • AF drive ( lens in MF or AF) • Mirror up • B mode • T
mode • Histogram (displays last histogram) • Grey balance expo-
sure • Cycle LM mode • Delete last image • Dig. foc. check
Stop down button function 5
• Stop Down
but can be reassigned to:
• Flash Measure • Interval timer • Multi
Exposure • Self Timer • Bracketing • AF drive ( lens in MF or AF) •
Mirror up • B mode • T mode • Histogram (displays last histogram)
• Grey balance exposure • Cycle LM mode • Delete last image •
Dig. foc. check • None • Standby (enters standby)
M.UP button function 6
• Mirror up
but can be reassigned to:
• B mode • T mode • Histogram (displays last
histogram) • Grey balance exposure • Cycle LM mode • Delete last
image • Dig. foc. check • None • Standby (enters standby) • Stop
Down• Flash Measure • Interval timer • Multi Exposure • Self Timer
• Bracketing • AF drive ( lens in MF or AF)
Control wheel direction 7
• Clockwise • Counter clockwise
Determines the effect the direction of the
controls wheels have on a setting.
For example, by moving the front control wheel to the le you
can alter the aperture setting from f/8 to f/6.8 to f/5.6 and so on.
By changing the wheel direction setting however, the same action
of turning the wheel to the le would then produce the opposite
effect, that is, the aperture settings would change from f/ 8 to f/
9.5 to f/ 11, and so on.
Flash ready exposure lock 8
• Yes • No
Allows you to make an exposure before the
flash is fully charged. For use with integral
flash unit or other TTL compatible flash units
connected to the hot-shoe. Not valid for flash units connected by
the PC connector.
Yes blocks the shutter until flash is ready.
No allows shutter release before flash is ready.
Magazine exposure lock 9
• Yes • No
Allows you to release the camera without a
film loaded in the magazine.
Yes blocks the shutter if there is no film in the magazine and also
displays a message on the grip LCD: No film.
No allows the shutter to be released with no film in the magazine.
Lens exposure lock 10
• Yes • No
Allows you to release the camera without a
lens attached.
Yes blocks the shutter if there is no lens attached and also displays
a message on the grip LCD: No lens.
No allows the camera to perform a release operation without a
lens.
Out of range exposure lock 11
• Yes • No
Allows you to release the camera when ei-
ther the aperture or shutter speed setting is
beyond the working range (indicated on the
LCDs by “--”).
Yes blocks the shutter if beyond the working range.
No allows the shutter to be released if beyond the working range.