


Hardware options installation 11
Hardware options installation
Introduction
If more than one option is being installed, read the installation instructions for all the hardware options and
identify similar steps to streamline the installation process.
WARNING: To reduce the risk of personal injury from hot surfaces, allow the drives and the
internal system components to cool before touching them.
CAUTION: To prevent damage to electrical components, properly ground the server before
beginning any installation procedure. Improper grounding can cause electrostatic discharge.
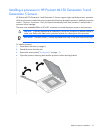
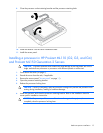
Access panel
WARNING: To reduce the risk of personal injury from hot surfaces, allow the drives and the
internal system components to cool before touching them.
CAUTION: Do not operate the server for long periods with the access panel open or removed.
Operating the server in this manner results in improper airflow and improper cooling that can
lead to thermal damage.
1. Power down the server (on page 6).
2. Extend the server from the rack, if applicable.
3. Loosen the two thumbscrews located on the server rear panel, if applicable.
4. Slide the access panel back about 1.5 cm (0.5 in).
5. Lift and remove the access panel.
To install the component, reverse the removal procedure.
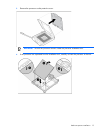
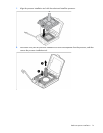
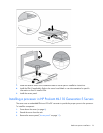
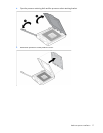
Processor option
This section provides the following procedures:
• Installing a processor in HP ProLiant ML150 Generation 3 and Generation 5 Servers (on page 12)
• Installing a processor in HP ProLiant ML110 (G2, G3, and G4) and ProLiant ML150 Generation 2
Servers (on page 15)
• Installing a processor in HP ProLiant ML110 Generation 5 Servers (on page 16)
• Installing a processor in HP ProLiant ML115 and ML115 Generation 5 Servers (on page 18)
For more information on installing a processor in a specific server, see the documentation that ships with the
processor option kit.