


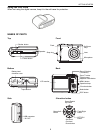


12
RECORDING
RECORDING
RECORDING STILL IMAGES
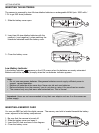
1. Hold the camera with both hands and make sure the camera is stable.
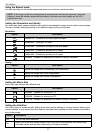
2. Set the camera to the
640
320
160
mode.
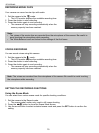
3. Aim the focus area to the subject that you want to take and press the shutter release button
halfway.
• The focus area on the LCD monitor will light green when the camera is in focus.
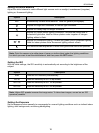
• If the shutter speed is slow or the possibility that image may be blurred, the shake warning icon
640
320
160
may appear on the LCD monitor. To avoid it, use a tripod to stabilize the camera when
recording images.
4. Fully press the shutter release button to take an image.
Note:
• Make sure that your fingers or the wrist strap does not block the lens.
• When the shutter release button is pressed halfway down, check the exposure value that
appears on the LCD monitor to make sure that it is appropriate for the lighting conditions.
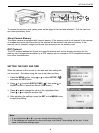
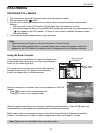
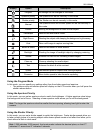
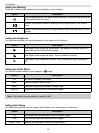
Using the Zoom Function
Your camera has a combination of optical and digital zoom
functions that allow you to zoom in on far away subjects or
zoom out for a wide angle shot.
The optical zoom is achieved by mechanically adjusting
the lens of the camera. The digital zoom enlarges or
shrinks the image using a software process.
When the zoom lever is pressed, the zoom bar appears on the LCD
monitor.
Press [W] to zoom out for a wide-angle shot.
Press [T] to zoom in for a telephoto shot.
When the optical zoom factor is at maximum, zooming stops temporarily. Press the [T] again, the
camera switches to the digital zoom automatically and zooming continues.
Digital zoom works by enlarging the center portion of an image through a software interpolation
process. The digital zoom is used to achieve magnification levels up to approx. 4 times.
Note: Digital zoom is unavailable when recording movies.
Zoom W button
(Thmbnail)
Zoom T button
(Digital zoom)