


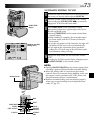
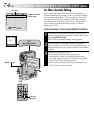
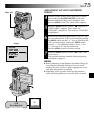
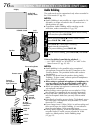


80 EN
TROUBLESHOOTING
(cont.)
SYMPTOM POSSIBLE CAUSES CORRECTIVE ACTION
11.
The color of Snapshot looks
strange.
12.
Although Snapshot is
attempted, flash does not
take place.
13.
Although a Snapshot is taken
with the flash, Red-Eye
Reduction does not take place.
14.
The image taken using
Snapshot is too dark.
15.
The image taken using
Snapshot is too bright.
16.
Digital Zoom does not work.
11.
•The light source or the subject
does not include white. Or
there are various different light
sources behind the subject.
•The Sepia or Monotone mode
is activated.
12.
•The subject is too bright with
the flash set to “AUTO” or
“AUTO ”.
•If blinks, the flash is being
charged.
•The camcorder is in the
Record mode.
• In the Menu Screen, “GAIN UP”
is set to “OFF” or “P.AE/EFFECT”
is set to “TWILIGHT”.
13.
•The subject does not look
straight toward the flash.
•The subject does not look at the
first flash, which is an important
part of Red-Eye Reduction.
•The camcorder is too far from
the subject.
•“FLASH” is not set to “AUTO
” in the Menu Screen.
14.
•“FLASH” is set to “OFF” in the
Menu Screen.
•The flash emission window is
covered by fingers, etc..
•The flash brightness is set to
produce a darker image
(adjustment value: –3).
•The camcorder is too far from
the subject.
•Shooting was performed
under backlit conditions.
15.
•“FLASH” is set to “ON” in the
Menu Screen.
16.
•10X optical zoom is selected.
•The MODE Dial is set to
“
DUAL
” or “ ”.
•“P.AE/EFFECT” is set to “VIDEO
ECHO” in the Menu Screen.
•“WIDE MODE” is set to “PS-
WIDE” in the Menu Screen.
•Picture Wipe or Dissolve are
being used in a scene transition.
11.
•Set “FLASH” to “ON” in the
Menu Screen. Or find a white
subject and compose your
shot so that it also appears in
the frame
(੬ pg. 20, 21, 32).
•Turn off Sepia and Monotone
(੬ pg. 38).
12.
•Set “FLASH” to “ON” in the
Menu Screen (੬ pg. 32).
•It can take up to 10 seconds
to charge the flash.
•Set the camcorder in the
Record-Standby mode
(੬ pg. 32).
•Set “GAIN UP” to “AUTO ”
or “AGC” (੬ pg. 29) or
disengage the “TWILIGHT”
mode (੬ pg. 38).
13.
•The subject should look straight
toward the flash, especially the
first flash. If the subject does not
see the first flash, it will be
difficult for Red-Eye Reduction
to take place (੬ pg. 32).
•The flash is effective for subjects
at a distance of approx. 0.7 m/
27-9/16" to 2 m/6.5 ft from the
camcorder (੬ pg. 32).
•Set “FLASH” to “AUTO ” in
the Menu Screen to display the
Red-Eye Reduction indicator
(੬ pg. 32).
14.
•Set “FLASH” to any position
except “OFF” in the Menu
Screen (੬ pg. 32).
•Do not cover the flash
emission window.
•Adjust the flash brightness to a
larger value (੬ pg. 33).
•The flash is effective for
subjects at a distance of
approx. 0.7 m/27-9/16" to
2 m/6.5 ft (੬ pg. 32).
•Press the BACKLIGHT Button
(੬ pg. 40).
15.
•Set “FLASH” to any parameter
other than “ON” in the Menu
Screen (੬ pg. 32).
16.
• Set “ZOOM” to “40X” or “200X”
in the Menu Screen (੬ pg. 29).
•Set the MODE Dial to “ ”
or “VIDEO” (੬ pg. 17, 22).
•Disengage the “VIDEO ECHO”
mode (੬ pg. 22, 38).
•Disengage the “PS-WIDE”
mode (੬ pg. 34).
•Wait until the Picture Wipe or
Dissolve effects are completed
(੬ pg. 22, 36).