


24
5 / BARS
∞/ AW
SETMENU
1234
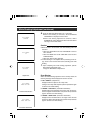
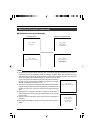
--- MENU ---
EXPOSURE. .
WH I T E B ALANCE. .
FILE M
..
PROCESS . .
CAPTURE. .
SYSTEM. .
EXIT
ANAGE
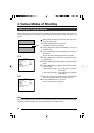
-- ---CE-WHITE BALAN
CEBALAN
TPRESE
WH I T E
BACKPAGE
0
LMANUA
0
LEVEL(R)
LEVEL(B)
LEVEL(R)
LEVEL(G)
LEVEL(B)
SHADING
- - - - - -
- - - - - -
- - - - - -
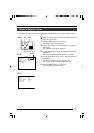
-- ---CE-WHITE BALAN
CEBALAN
AUTO
WH I T E
BACKPAGE
0
LMANUA
0
LEVEL(R)
LEVEL(B)
LEVEL(R)
LEVEL(G)
LEVEL(B)
SHADING
- - - - - -
- - - - - -
- - - - - -
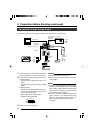
3. Setting and Adjustment During Shooting (continued)
[MENU] [SET]
[5]
[∞]
3. 4.
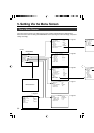
White Shading Adjustment
2.
1.
Perform the following setting upon adjusting white balance.
☞ Page 22
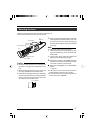
Ⅵ Auto White Shading Adjustment
Make sure that the Switch 4 located at the side of this unit is set to
[OFF] (lower side).
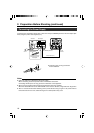
1.
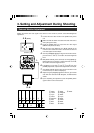
Press the [MENU] button for 1-2 seconds.
The “MENU” screen will be displayed.
2.
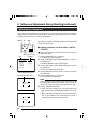
Use the [5/∞] buttons to select “WHITE BALANCE..”, then press
the [SET] button.
The “WHITE BALANCE” screen will be displayed.
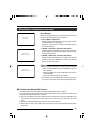
3.
Use the [5/∞] buttons to select “SHADING”, then press the [SET]
button.
The set value starts blinking and adjustment is possible.
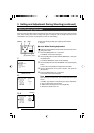
4.
Use the [5/∞] buttons to set value to “AUTO”, then press the
[SET] button.
5.
Press the [MENU] button for 1-2 seconds.
The normal screen will be displayed.
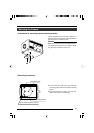
Note
After returning to normal screen, shoot a white object to the entire
screen.
In addition, pay attention to the followings for proper adjustment.
● Use an object which is evenly white.
● Adjust so that the object has an even brightness.
● Set the lens aperture from F4.
“WHITE BALANCE” Screen
“MENU” Screen
Blinking
There are cases when white balance is achieved for the center of the screen but not for the upper and lower
ends, hence causing other colors to appear with green or magenta. This is brought about by the lens
characteristics. The process of rectifying this is known as white shading.
Switch 4: [OFF]