


12
Getting Started
Alarm
VN-V25U comes with a motion detection feature
and dual alarm input.
By motion detection or alarm input, actions such
as mail delivery, message transmission via TCP/
UDP, alarm output can be triggered. These
actions can also be triggered by combination of
two alarm inputs.
Installing an FTP server enables uploading of
JPEG images before and after the alarm input
time (pre-/post-recording) to the server.
AAlarm PageB (A Page 42)
AJPEG Viewer ConfigurationB (A Page 78)
Restrictions on Clients
VN-V25U enables users to authorize or reject the
acquisition of images by specific IP address.
(
A
Page 60)
Control via customized application
software
The following uses are also possible by
developing a customized application software
that supports the API of VN-V25U.
For details, please refer to AAPI GuideB in the
supplied CD-ROM.
● Monitors via the computer while at the same
time records images to the HDD of the
computer.
● Performs recording by changing the frame
size/frame rate during alarm occurrence.
● Records the type and time of alarm
occurrence on the computer.
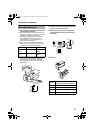
Step 1 Connection/Installation
(A Page 14)
T After adjusting the camera angle using the
[MONITOR OUT] terminal, set the
[MONITOR OUT] switch to AOFFB. Images
are not distributed to the network when
ANTSCB or APALB is selected. After changing
the [MONITOR OUT] switch setting, press
the Reset button to reboot the camera.
G
Step 2 Network settings (A Page 23)
T In a system where multiple units of VN-V25U
are used, turn on the power of only one unit
to configure the IP address settings using the
Internet Explorer. Upon doing so, turn on the
power of the second unit and configure
accordingly. Configure the settings for the
other cameras using the same procedure.
G
Step 3 Configuring settings using the
Internet Explorer (A Page 29)
G
Step 4 Operating the built-in viewer
(A Page 73)
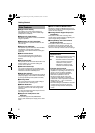
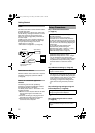
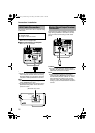
ALC
LEVEL
AvPk
LH
MACaddress
Computer
Sending JPEG images
before and after alarm
input to FTP
Alarm Device
Network
VN-V25U
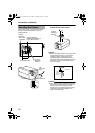
Setup Procedures
Connect the lens mount, power supply cord,
LAN cable and alarm.
Next, mount the camera to the ceiling.
Remember also to mount the fall prevention
wire. After the camera is mounted, connect the
video monitor to the [MONITOR OUT] terminal
at the rear of the unit, followed by adjusting the
camera angle.
You can select the video signals of the
[MONITOR OUT] terminal using the
[MONITOR OUT] switch. (
A
NTSC
B
or
A
PAL
B
)
(Back focus adjustment
A
Page 20)
([MONITOR OUT] switch
A
Page 10)
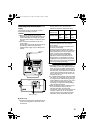
Configure the network settings of the
computer and this camera.
Configure the picture quality and alarm
settings using the Internet Explorer.
The built-in viewers enable you to monitor
JPEG and MPEG4 images and save JPEG
images.
VN-V25U_EN.book Page 12 Friday, November 2, 2007 11:26 PM