


Using the wireless features of your photo printer
www.kodak.com/go/support
31
Add the printer as a wireless printer to your computer:
a From the Start menu, select Programs (or All Programs).
b Open the Kodak folder, then open the EasyShare printer folder.
c Select Kodak wireless printer computer setup assistant.
d Click Next.
e Select the printer, then click Next.
The wireless printer is added to your computer (represented as a wireless “copy” of your
printer in the Windows OS list of printers).
Mac OS X—Add the printer to your computer:
See Connecting to a computer, page 19.
Configure the printer Wi-Fi settings:
a Open the finder window, then click the Applications button. (Or open the
Applications folder on your operating drive.)
b Open the Utilities folder, then double-click Print Setup Utility.
c Select the printer from the list, then click Utility.
d Change Wi-Fi settings as necessary to match the settings of your Wi-Fi wireless
network. See the wireless configuration utility Help for details.
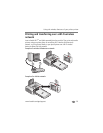
5 Close all programs on your computer, then disconnect the USB cable between the
computer and the printer.
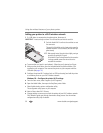
6 (Optional) Print a copy of your wireless settings for future reference:
At the same time, press and hold the Print button and the Transfer button for 5
seconds.