


Connecting the PIP-300 Picture in Picture Inserter
9
6 Connecting the PIP-300 Picture in Picture Inserter
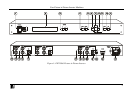
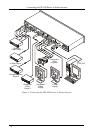
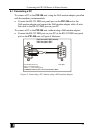
To connect your PIP-300
1
, as the example in Figure 3 illustrates, do the
following
2
:
1. On the INPUT 1 set
3
connect
4
:
An s-Video source to the Y/C INPUT 4p connector (for example, an
s-Video player 1)
A component video source to the Y, B-Y, and R-Y INPUT BNC
connectors (for example, a BETACAM video player 1)
2. On the INPUT 2 set
4
connect a composite video source to the CV INPUT
BNC connector (for example, a composite video player 2)
3. On the INPUT 3 set
4
connect a composite video source to the CV INPUT
BNC connector (for example, a composite video player 3)
4. Connect the OUTPUT connectors
5
, as follows:
The CV OUTPUT BNC connector to the composite video acceptor
(for example, a composite video display)
The Y/C OUTPUT 4p connector to the s-Video acceptor (for
example, an s-Video display)
The Y, B-Y, and R-Y OUTPUT BNC connectors to the component
video acceptor (for example, a component video projector)
5. Connect a PC or other controller, if required (see section 6.1).
6. Connect the power cord
6
(not illustrated in Figure 3).
1 From this section on, all the information is relevant to both the PIP-200xl and the PIP-300 machines, unless noted otherwise
2 Switch OFF the power on each device before connecting it to your PIP-300. After connecting your PIP-300, switch ON its
power and then switch on the power on each device
3 PIP-200xl has two sets of inputs, the PIP-300 has three sets of inputs
4 You do not have to connect all the inputs in each set
5 If only one output is required, connect that output to the PIP-300, and leave the other outputs unconnected
6 We recommend that you use only the power cord that is supplied with this machine